When Salesforce is life!

Tag: Sandbox

The Role of Sandboxes and Scratch Orgs in Salesforce DevOps

This is a contributor post. For any question, please contact me for more details.


Salesforce DevOps is the amalgamation of software development and IT operations. It aims to speed up the development cycle, enabling continuous, high-quality software delivery.

In Salesforce DevOps, sandboxes and scratch orgs are essential as they provide isolated environments for development, testing, and staging without disrupting the production environment. 

By facilitating continuous integration, delivery, and collaboration, these tools align with the core principles of DevOps, streamlining the application lifecycle from development to deployment.

Understanding Salesforce DevOps

Salesforce DevOps assists in developing and deploying Salesforce applications. It enables organizations to deliver applications and services rapidly and efficiently.

By promoting collaboration between developers and operations teams, DevOps practices help reduce the time to move from code committed to successfully running production.

Critical Components of Salesforce DevOps

  1. Continuous Integration and Delivery (CI/CD): This is a critical aspect of Salesforce DevOps, where developers frequently commit code to a shared repository, and automated builds and tests are run. Continuous delivery extends this by automatically deploying code to production after it passes tests, ensuring that code is always in a deployable state.
  2. Automation: In Salesforce DevOps, automation eliminates manual efforts, reduces errors, and speeds up processes. It is used in testing, deployment, and monitoring to ensure consistent and error-free operations.
  3. Infrastructure as Code (IaC): This practice involves managing and provisioning computing infrastructure through machine-readable scripts rather than manual processes. It promotes consistency and scalability in the infrastructure.
  4. Monitoring: Monitoring tools track application performance, usage, errors, and other metrics. This data is essential for maintaining system health and for making informed decisions.
  5. Cultural Changes: Salesforce DevOps is not just about tools and technologies; it also involves a cultural shift. This includes breaking down silos between development and operations teams, fostering collaboration, promoting ownership, and encouraging continuous learning and improvement.

Image Source: Salesforce

Process and Workflow in Salesforce DevOps

The Salesforce DevOps process typically involves several stages, each with specific workflows:

  1. Plan: This includes defining the requirements, designing the solution, and planning the work.
  2. Code: Developers use Salesforce’s development tools and environments to code the solution. Code is version-controlled, typically using Git.
  3. Build and Test: Code is built into a release and tested. Automated tests are used to verify that the solution works as expected.
  4. Deploy: The release is deployed to a staging environment for further testing and review. Once approved, it’s deployed to the production environment.
  5. Operate: The application is monitored, and any issues are addressed. User feedback is gathered for future improvements.
  6. Learn and Improve: Data from the operation phase and user feedback are used to learn and improve the application and the development process.

Deep Dive into Salesforce Sandboxes

In Salesforce, a sandbox replicates your production environment for testing and development. It provides a space where developers can safely experiment, build, and test changes without affecting the live application.

4 Types of Sandboxes in Salesforce:

  1. Developer sandboxes: Created explicitly for coding and testing purposes, allowing a single developer to work with a copy of the organization’s configuration without any production data.
  2. Developer Pro: Developer Pro sandboxes are similar to Developer sandboxes but provide more storage. They’re designed to handle more extensive development and testing tasks and accommodate larger teams.
  3. Partial Copy: Contain your organization’s metadata and a sample of your production data. They are used for complex testing and training purposes.
  4. Full: Full sandboxes are a complete copy of your production org, including all data and metadata. They are used for performance testing, load testing, and staging.

How to Use Sandboxes in Salesforce Development

Salesforce Sandboxes are used for development, testing, and training without compromising the data and functionality of the production environment.

Here are the steps to use sandboxes in Salesforce development:

  1. Create or refresh a Sandbox: Based on the requirements, create or refresh a sandbox using (Developer, Developer Pro, Partial Copy, or Full).
  2. Develop and Test: Developers make the necessary changes and additions in the sandbox environment, including creating new features, customizing existing ones, or fixing bugs. Once the changes are made, they can perform unit tests to ensure everything works as expected.
  3. User Acceptance Testing (UAT): After the developer’s testing, the business users or QA team can review and test the changes.
  4. Deploy to Production: After successful UAT, the changes can be deployed to the production environment using change sets, Salesforce CLI, or any third-party CI/CD tool.

Image Source: Salesforce

Benefits and Limitations of Using Sandboxes

There are benefits and limitations to using Sandboxes. Knowing them can help your team utilize them to their full potential:

BenefitsLimitations
Different teams can use multiple sandboxes for simultaneous development and testing.Keeping Sandboxes synchronized with the production environment can be challenging.
Sandboxes can train users and test real-world scenarios without impacting live data.The number of available sandboxes depends on your Salesforce edition and the licenses you have.
A safe environment to develop and test changes without affecting the live production environment.Full and Partial Copy sandboxes have specific refresh intervals (29 days and 5 days, respectively), which can limit their usability in specific scenarios.


In-depth Understanding of Salesforce Scratch Orgs

Salesforce Scratch Orgs are temporary environments that can be fully customized to mirror different Salesforce editions with varying features and preferences. As part of Salesforce DX, Scratch Orgs are source-driven, disposable deployments of Salesforce code and metadata.

Setting up and Configuring Scratch Orgs

Setting up a Scratch Org involves these steps:

  1. Install Salesforce CLI: Salesforce Command Line Interface (CLI) is a powerful tool required to create and manage Scratch Orgs.
  2. Authenticate Dev Hub: You must authenticate with your Dev Hub org before creating a Scratch Org. Dev Hub is the central hub that controls creating and provides services for Scratch Orgs.
  3. Create a Scratch Org: After authentication, you can create a Scratch Org using the “sfdx force:org:create” command.
  4. Push Source to Scratch Org: You then push your source into the Scratch Org using the “sfdx force:source:push” command.

Image Source: Salesforce

Use Cases and Best Practices for Scratch Orgs

Here are a few use cases and best practices:

  1. Feature Development and Testing: Scratch Orgs are perfect for developing and testing a new feature or bug fix. Each developer can have their own Scratch Org to work independently.
  2. Continuous Integration and Continuous Delivery: Scratch Orgs can be used in CI/CD pipelines where automated tests are run in a Scratch Org to ensure code quality.
  3. Source-Driven Development: One best practice with Scratch Orgs is to always pull changes from the Scratch Org to keep the version control system current.
  4. Dispose after use: As Scratch Orgs are temporary, dispose of them after developing or testing to effectively manage the available Scratch Orgs.

Benefits and Limitations of Scratch Orgs

There are benefits and drawbacks to Scratch Orgs that developers must be aware of.

BenefitsLimitations
Scratch Orgs provide isolated environments that can be tailored to match specific development needs.Scratch Orgs are temporary, and keeping track of changes if they’re not correctly pulled into source control can be a challenge.
They support a source-driven development modelThe number of active Scratch Orgs you can have depends on your Salesforce DX edition and licenses.
Scratch Orgs are ideal for automated testing and continuous integration, which promotes rapid, reliable releases.The shift from org-based to source-driven development with Scratch Orgs can be a steep learning curve for some developers.

Relative Analysis of Sandboxes and Scratch Orgs

The following analysis overviews the similarities and differences between Sandboxes and Scratch Orgs.

  1. Environment for Testing and Development: Sandboxes and Scratch Orgs are isolated environments used for development and testing. They allow developers to create, modify, and test features without affecting the production environment.
  2. Replication of Production Environment: Sandboxes and Scratch Orgs replicate your production environment. They can be configured to mimic different Salesforce editions with different features and preferences.

Differences between Sandboxes and Scratch Orgs

Choosing between these tools can be complex, but knowing the difference can help make your decision.

SandboxesScratch Orgs
Include production data (based on the sandbox type.)Scratch Orgs are empty environments that don’t contain any data from your production org.
No expirationLimited lifespan (maximum of 30 days)
Used for multiple stages of development, including development, testing, staging, and training.A source-driven development model where changes are tracked in a version control system.

Use Cases for Each: When to Use Sandbox v.s Scratch Org

The following cases state which tool best suits a specific task.

  1. Sandbox: Use Sandboxes for tasks that require persistence and longer-term stability. Sandboxes are ideal for final-stage testing, performance testing, user training, and for staging environments for quality assurance. They are also helpful when you need a copy of your production data for development and testing.
  2. Scratch Org: Use Scratch Orgs for short-term tasks, such as developing new features or testing the impact of changes. They are best suited for individual developers or teams following a source-driven development model. They are also suitable for automating unit tests and implementing continuous integration/delivery pipelines.

Role of Sandboxes and Scratch Orgs in Salesforce DevOps

Continuous Integration (CI) regularly merges code changes into a central repository. Both Sandboxes and Scratch Orgs play a critical role in CI. Developers can use Sandboxes or

Scratch Orgs to create and test features before integrating them into the main codebase. Scratch Orgs are particularly useful for CI because they’re easily made, disposed of, and can be aligned to specific user stories or tasks, enabling isolated testing and reducing potential conflicts.

Role in Continuous Delivery and Continuous Deployment

Continuous Delivery and Continuous Deployment extend CI by automating the release of changes to staging or production environments. Sandboxes can serve as staging environments for these releases, allowing final testing and review before deployment to production.

On the other hand, Scratch Orgs can be incorporated into delivery pipelines to automate the creation of temporary environments for testing. This ensures that code is always in a deployable state, reduces the risk of deployment failures, and speeds up the delivery process.

How Sandboxes and Scratch Orgs Enhance Collaboration and Efficiency

Sandboxes and Scratch Orgs promote a collaborative approach to development. Multiple developers can work simultaneously in different Sandboxes or Scratch Orgs without affecting each other’s work.

Scratch Orgs are tied to source control, allowing easy tracking of changes and facilitating collaboration across distributed teams. The ability to quickly set up, test, and dispose of Scratch Orgs boosts efficiency. With their persistence, Sandboxes allow for extended collaboration over longer project timelines.

Impact on Testing and Quality Assurance

Testing and quality assurance is integral to the software development lifecycle. Sandboxes enable developers to test new features in an environment closely mirroring production. The ability to copy production data (in Full and Partial Copy sandboxes) allows for realistic and robust testing.

Scratch Orgs, being fully configurable, can mimic very specific testing scenarios, providing an environment for fine-grained, accurate tests. By utilizing these tools, developers can catch and fix issues early, ultimately enhancing the quality of the application.

Conclusion

In conclusion, Salesforce Sandboxes, and Scratch Orgs are critical assets in the Salesforce development environment, enabling safe, flexible, and efficient application creation, testing, and deployment.

The Salesforce DevOps landscape, enriched with the complexities and ever-expanding features of Sandboxes, Scratch Orgs, and the Salesforce DX framework, offers a rewarding journey for novice and experienced developers.

Understanding and mastering these tools is pivotal in delivering robust, high-quality applications and fostering continuous learning, growth, and impactful contributions within your organization.

Who needs so many records?

Today’s post has been written by Nikos Mitrakis, the creator of Forceea, an amazing Data Factory Framework for Salesforce.
Some facts about Nikos:
– Salesforce Developer at Johnson & Johnson EMEA Development Centre (EDC)
– Started his Salesforce journey in 2014
– Has passed 13 certifications, including Application & System Architect
– Holds a Physics degree
– Married since 1994, has a daughter
– Loves watching sci-fi movies and good comedies
– Lives in Limerick, Ireland


A first question you probably have when you read about creating millions of records is “Who really needs to create millions of records?” Sometimes it’s not “millions”; it’s anything between a few thousands to hundreds of thousands of records. But the need is the same: a flexible tool that can insert (and delete of course) many SObject records and will allow:

  • Companies of any size create sandboxes for User Acceptance Testing (UAT).
  • AppExchange ISV/Consulting partners create orgs with sample data for demos or for a realistic simulation of their app.
  • Testers or business users generate their testing data in a sandbox.
  • Architects create Large Data Volumes (LDV) for stress testing of their designs.

Forceea overview

Forceea data factory (a GitHub project) can create data using the Dadela data generation language. The framework can insert/update records synchronously for test methods (or for inserting a few hundreds of records) in your org, but it can also insert/delete records asynchronously.

Forceea has a rich set of powerful data generation tools and it’s the most sophisticated data factory for Salesforce. The latest release adds variables, permutations of serial values and the first function-x definition.

I can hear you asking: “How complex (or “difficult”) is to create records with Forceea asynchronously? Should I know to write code?

The answer is “Yes, you should write a few lines of Apex code. But, NO, it’s not difficult at all!”. Sometimes the data creation is complex because we must have a deep knowledge of how our SObjects are related to each other, but this doesn’t need advanced programming skills.

So, what is needed to start working with it?

  • A Template.
  • An anonymous window to execute Apex scripts.
  • A Lightning component to monitor the progress.

Let’s start with..

The Template

In my previous article How to create an Apex reusable Data Factory Library using Forceea Templates, we had constructed some Templates using an older version of Forceea. The good news is that Forceea now inherently supports Templates, so the Template creation process is simpler.

What is a Template

A Template will not create data; it’s a “description” of the structure of the data we want to create.

When we construct a Template we define:

  • The SObjects that will be created.
  • The number of records of each SObject.
  • What fields will be populated.
  • The structure of field values.

A Template is a Map<String, FObject>, so our Template will start with the initialization of this Map:

Map<String, FObject> template = new Map<String, FObject>();

Defining what data we need

Before starting our Template we should have a good understanding of the SObjects and fields we need, what are the relationships between the SObjects and what data we want for each field.

Here are our (hypothetical) requirements:

Accounts

  • Record type: the record type with name MajorAccount.
  • Name: Account-1, Account-2, etc.
  • Industry: any picklist value except Banking and Services.
  • AnnualRevenue: a random integer number between 1M and 10M.
  • Rating: any picklist value.
  • Type: any random value between Prospect, Customer and Analyst.
  • Shipping address: any (real) address from U.S.

Opportunities

  • Record type: the record type with name BigOpp.
  • Name: <Account> – <text>, where <Account> is the name of the related account and <text> is a text of random words between 20 and 40 chars.
  • Amount: a random number between 10K and 1M, rounded to nearest 100.
  • StageName: any picklist value except Closed Won and Closed Lost.
  • Type: New Business.
  • CloseDate: any date between 1 Jan. 2020 and 30 June 2020.
  • AccountId: the 1st account to the 1st opportunity, the 2nd account to the 2nd opportunity and so on. If we have no more accounts, start from the 1st account, then to the 2nd, etc.

For every 1 account we’re going to create 10 opportunities.

The template for accounts

First, we “add” the Account definitions in our template:

template.put('Accounts', new FObject(Account.SObjectType)
  .setNumberOfRecords(10)
  .setDefinition(Account.Name, 'static value(Account-)')
  .setDefinition(Account.Name, 'serial type(number) from(1) step(1) scale(0)')
  .setDefinition(Account.Industry, 'random type(picklist) except(Banking,Services)')
  .setDefinition(Account.AnnualRevenue, 'random type(number) from(1000000) to(10000000) scale(0)')
  .setDefinition(Account.Rating, 'random type(picklist)')
  .setDefinition(Account.Type, 'random type(list) value(Prospect,Customer,Analyst)')
  .setDefinition(Account.ShippingStreet, 'random type(street) group(shipping)')
  .setDefinition(Account.ShippingPostalCode, 'random type(postalCode) group(shipping)')
  .setDefinition(Account.ShippingCity, 'random type(city) group(shipping)')
  .setDefinition(Account.ShippingState, 'random type(state) group(shipping)')
  .setDefinition(Account.ShippingCountry, 'random type(country) group(shipping)')
);
  • The order of the field definitions is important! Forceea generates the values for the first field definition, then for the second, etc.
  • The Name field has 2 definitions. The first generates the same (static) value “Account-” and the second serial numbers (1,2,3,..)
  • We “grouped” all address definitions in order to “link” the correct street to the correct city, postal cod, etc.
  • If we had a Billing address, we could copy the value from the Shipping, e.g. setDefinition(Account.BillingCity, 'copy field(ShippingCity)')

The Template for opportunities

Now we are going to set the Opportunity definitions:

template.put('Opportunitites', new FObject(Opportunity.SObjectType)
  .setNumberOfRecords(100)
  .setDefinition(Opportunity.AccountId, 'serial lookup(Account) mode(cyclical) source(forceea)')
  .setDefinition(Opportunity.Name, 'copy field(AccountId) from(Account.Name)')
  .setDefinition(Opportunity.Name, 'static value(" - ")')
  .setDefinition(Opportunity.Name, 'random type(text) minLength(20) maxLength(40)')
  .setDefinition(Opportunity.Amount, 'random type(number) from(10000) to(1000000) scale(2)')
  .setDefinition(Opportunity.StageName, 'random type(picklist) except(Closed Won,Closed Lost)')
  .setDefinition(Opportunity.Type, 'static value(New Business)')
  .setDefinition(Opportunity.CloseDate, 'random type(date) from(2020-01-01) to(2020-6-30)')
);

The FObjectAsync class

Now we can proceed with the actual insertion of records. Our main tool is the FObjectAsync class.

How the async process works

When we insert or delete records asynchronously, Forceea uses Queueable Apex to execute one or more jobs. These jobs have some higher governor limits (e.g. 60,000ms total CPU time and 200 SOQL queries), which is definitely positive for our data generation needs.

If you think “I’m going to create x accounts and y opportunities”, forget this way. Forceea works with iterations! An iteration is the number of records (for each SObject) defined in the Template we use. Our template creates 10 accounts and 100 opportunities, so 1 iteration will create 10 accounts and 100 opportunities.

Another important detail is Partitioning, which has two parts:

  • Template: you define the Partition field for each SObject with the method setPartitionFieldName.
  • FObjectAsync: you define the Partition field value for all SObjects with the method setPartitionFieldValue.

The Partition field value should be a string which will identify (or “partition”) the inserted records. As a best practice, use a value with a few characters, even a single letter (uppercase or lowercase).

When inserting records, Forceea checks:

  • If there is a Partition field defined in each SObject.
  • If there is a Partition field value.

If both conditions are valid, Forceea will insert the value in the partition field of each record. So, let’s say that the Partition field for Account is ForceeaPartition__c and the Partition field value is df. In this case, Forceea will insert the value:
• df1 into the records inserted in Job 1.
• df2 into the records inserted in Job 2.
• df3 into the records inserted in Job 3.
etc.

Insert records asynchronously

Now we are going to insert 1,000 iterations, so we’ll insert 1,000 x 10 = 10K accounts and 1,000 x 100 = 100K opportunities.

Open an Anonymous Apex window and enter the following lines:

new FObjectAsync(template)
    .setNumberOfIterations(1000)
    .setNumberOfJobs(20)
    .setPartitionFieldValue('df')
    .insertRecords();
  • The default number of (parallel asynchronous) jobs is 30. Here we require 20 jobs.
  • The partition value is “df”.

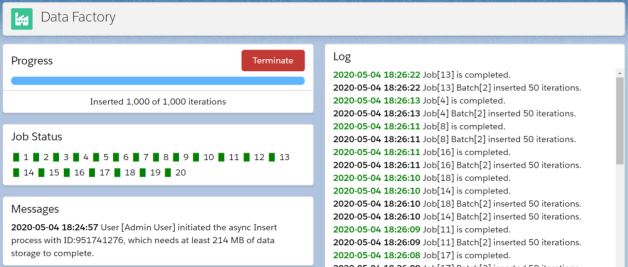
Execute the code and then go to the Data Factory tab of the Forceea Lightning app.

  • In the Log panel Forceea displays information about the execution of each job.
  • The Messages panel contains an overview of the async process.
  • The Progress panel will let you know how many iteration have been inserted.
  • Finally, the Job Status panel displays a visual indication of the status for each job (black: pending, green: successful, red: failure, orange: terminated).

Forceea will follow this procedure during the async insertion process:

  • Benchmarks the operation by inserting 1 iteration in the first batch. The transaction is rolled back, so it doesn’t permanently insert any records.
  • Executes the second batch of any job, which creates and insert records of each SObject defined in the Template, with as many iterations as possible (remember the benchmarking).
  • If there are no errors and there are more iterations to be inserted, a third batch is created, and so on.
  • When all iterations assigned to a job have been inserted, the job ends with a successful completion.

When we have a serial definition, Forceea will insert the records without any gaps in the serialization!

Delete records asynchronously

The deletion process follows almost the same logic:

new FObjectAsync(template)
    .setNumberOfJobs(20)
    .setPartitionFieldValue('df')
    .deleteRecords();

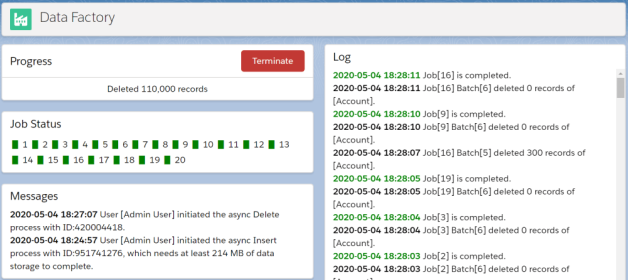
Execute the above Apex code and then go to the Data Factory tab to watch the progress.

Forceea will follow these steps during the async deletion process:

  • Reverses the order of SObjects in the Template, so the last SObject will get the first position, etc.
  • If all SObjects in the Template have a Partition field and FObjectAsync has a Partition field value, a number of jobs are enqueued for parallel processing (each job will delete all records of different partitions), otherwise it enqueues only 1 job (no partitioning).
  • The deletion starts from the SObject in the first position, executing the first batch of each job, which benchmarks the transaction to calculate the maximum number of records that can be deleted in every batch. This first benchmarking batch deletes up to 200 records.
  • If there are no errors and there are more records to be deleted, a second batch is created after the completion of the first batch, and so on.
  • When all SObject records assigned to a job have been deleted, the job moves to the second SObject, etc.

Important: if Forceea finds in the Template a definition for the RecordTypeId field of an SObject, it will delete the records of this Record Type only.

Forceea will stop the execution of a job when an error is encountered, except from the errors related to record locking, where it will raise an error only after the 5th occurrence of the UNABLE_TO_LOCK_ROW error.

Using existing lookup records

Forceea will take care of all the complex orchestration of the asynchronous process. The parallel processing offers an advantage, but it’s based on the assumption that we won’t query any existing records from the database, otherwise we may have record locking.

For example, if we have a custom SObject Language__c and we have the lookup field Language__c on Opportunity, to get random IDs for this field we would use:

setDefinition(Opportunity.Language__c, 'random lookup(Language__c) source(salesforce)')

If the above definition raises the UNABLE_TO_LOCK_ROW error (unable to obtain exclusive access to this record), then your only option is to use 1 job only with setNumberOfJobs(1).

Conclusion

Nobody can say that data generation is simple or without issues. Under the hood, the data generation process is quite complex, but it shouldn’t be to the user; Forceea will gracefully handle all the complexity.

I strongly believe that an admin, a tester or even a business user, with no Apex knowledge, can insert/delete records asynchronously using FObjectAsync and existing Templates, which a developer or advanced admin could create.

You can find the code of the above scripts in Forceea-training GitHub repo. And don’t forget to read the Forceea Success Guide; it has a lot of examples and details.

Powered by WordPress & Theme by Anders Norén