When Salesforce is life!

Tag: Callout

Request Loop: there’s a new free app in (AppExchange) town

A new AppExchange app by WebResults (Engineering Group)

Question: What happens if you put a messy Salesforce MVP in charge of the Innovation Team of WebResults?

Answer: a lot of mess for sure, but also funny stuff!

TL;DR Request Loop is a new free AppExchange app delivered by the Innovation Team from WebResults to help in Salesforce callouts and callins development/debugging.

What is WebResults’ Innovation Team?

I work in WebResults since 2009, when I first moved my steps into the Salesforce world, starting from junior developer till my current position as “Salesforce Solutions” Unit Manager (soon to be called “Innovation Team”).

We are a team of passionate Salesforce professionals who struggle to keep up with the technological changes in the Salesforce ecosystem and try to move our company forward…we are a sort of R&D team.

As far as I’ve seen during the past years, this is not obvious for a big company, whose people are focused on the delivery, to keep a group of people focused on innovation and research…that’s why I’m really happy to do this job!

What do we do?

  • Professional services: sometimes we are called as firefighters by our colleagues when needed to help with difficult tasks or technical issues
  • Innovation tours: we plan meetings with our customers to show off new features or products
  • Knowledge Hub: we try to keep track of diverse Salesforce related knowledge docs and best practices for the benefit of all WebResults
  • Evangelization: we struggle to keep the company technologically engaged and updated
  • Creative app development: is there a problem we have solved in a creative way or that can “cross-project” benefit? let’s package it and create a new app for the whole company and Salesforce Ohana!

Awesome, huh?

What’s Request Loop?

Request Loop has been built to:

  • detect SOAP callouts request body (as you know, Salesforce doesn’t let you get the full body of an Apex SOAP request)
  • simulate REST/SOAP callouts from within Salesforce boundaries (i.e. coming from Salesforce IPs)
  • create a bin that can receive callins from an external system within Salesforce bounds in order to get what’s going on (again, it’s difficult to debug an Apex SOAP callin)
  • Keep everything within Salesforce boundaries (it shoulnd’t be done, but often sandboxes use real data and it’s not good to send business data in unsecure/untrusted clouds)

Request Loop is a free tool meant for developers who want to debug webservice communications both inbound and outbound. This tool has been imagined as a quick disposal package that anyone can install in a DE org or a sandbox (even production but it is unlikely and not suggested to debug directly in production), use until necessary and then uninstall to clean up everything.

This package is composed by 2 features:

  • Request Bin: an inbound Apex webservice that can receive any supported HTTP call (REST or SOAP) and log it for further analysis. This tool can also simulate the response of a valid service (just like the famous Requstb.in online service). Imagine you need to get the SOAP payload of an Apex webservice: no Salesforce tool is available for this porpoise and with Request Loop you can inspect the content message on the fly safely.
  • Request Client: a tool to send outbound callouts from Salesforce to outside systems. This tool can be used to simulate an external system call from within Salesforce to test a service without the need of a complete Apex implementation.

For a detailed configuration guide, have a look at the user manual on the AppExchange listing page.

Request Bin

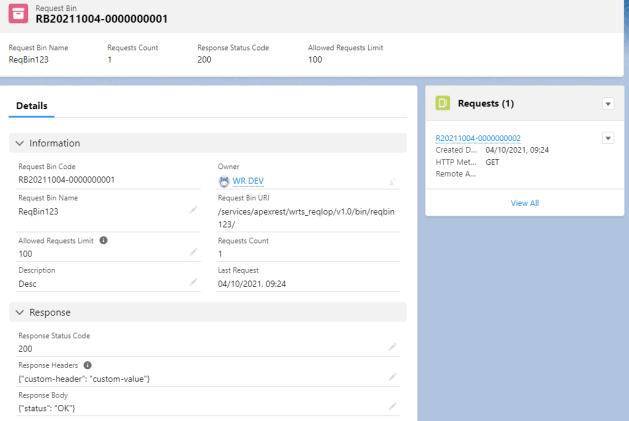
A Request Bin is simply a record on the Request Bin object definition which handles:

  • Request bin’s name (which identifies the service URL to point your external system to)
  • A valid HTTP response code
  • Optional response headers
  • Optional response body
Request Bin configuration

Once you have exposed your bin to the world (by calling the Apex webservice with a valid session token or publishing it inside a public community/site) you can call it from an external system and analyze/debug the requests stored on Request records (request bodies are stored on Files attached to the Request record).

Easy as 1-2-3 or a.b.c…you tell me!

Request Client

Now that we have a configured Request Bin that can take any incoming request, we’ll have a look at the Request Client too that can generate a callout by hand. Click on the Home tab of the Request Loop app:
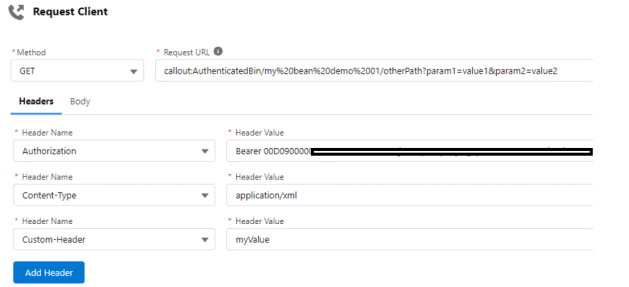
Request Client example configuration

You can configure:

  • Supported HTTP method (Salesforce supports a sub-set of HTTP methods, GET / PATCH / PUT / POST / DELETE)
  • Request URL, which helps you with an autocomplete behavior for Named Credentials, otherwise you can set your own custom URL (remember to add the Remote Site configuration to enable that specific endpoint)
  • Request headers, with an autocomplete features for the main standard headers (the “Content-Type” header has an autocomplete behavior for the value as well, showing the main standard content types)
  • the Request body
Request Body example

Click the Send button and you’ll get response’s body and headers:

Response body
Response headers

Use the Download Body link to download a file with the response body on it.

Finally using the Recent Requests tab you can get a list of the last requests done and send them again (info are stored on the local storage):

List of recent requests made through the Request Client

What are you waiting?

It’s free, useful, safe and easy to install, take a tour and tell us what you think and drop a quick review on the AppExchange!

From WebResults
for the Salesforce Ohana with 💙

[Salesforce / Apex] Let’s play with Named Credentials and OAuth 2.0

Few days ago I was lurking in the Named Credentials configurations.

What are named credentials?

Here are the official docs.

They are essentially a way to store callout configurations such as:

  • Endpoint (only HTTPs endpoints are supported)
  • Callout certificate (if needed, from the local key store)
  • Authentication protocol (if needed)
  • Authentication settings

With named credentials you don’t need Remote Site Setting configuration anymore: add you credential and the job is done!

The Endpoint stores the callout URL but it could also store a part of the endpoint (e.g. only the domain or a specific piece of path, such as https://na1.salesforce.com/services/Soap/class/).

The Callout certificate grabs a certificate from the Certificate and Key Management setup page, allowing a more secure connection between hosts.

I’m going to focus on the Authentication protocol.

You can choose among the following values:

  • No Authentication
  • Password authentication
  • OAuth 2.0

And you can set the authentication globally (Identity type = Named principal) or per user (Identity Type = Per User): if you don’t need any authentication, just use the value “Identity Type = Anonymous”

The password authentication is pretty straightforward: it uses BASIC authentication (username/password BASE64 encoded sent in the request headers).

But what about OAuth2?

I wanted to test this option using all but the Salesforce platform: there are plenty of services that expose the OAuth 2.0 authentication, but I love Salesforce and that’s how I want to test things!

You need 2 orgs:

  • Remote ORG: this will be the provider of your OAuth 2.0 authentication, it hosts the remote service you want to access (and that you can only access with this ORG’s user)
  • Local ORG: this is the ORG where you want to invoke the remote service and where you are configuring the Named Credentials

Setup the Remote ORG

First let’s setup the remote service.

Create a new SOAP webservice:

global class EchoManager {
    webservice static String echo(String text){
        return 'ECHO FROM ORG '+UserInfo.getOrganizationId()+': '+text;
    } 
}

This service echoes the request text’s returning also the remote ORG ID.

Useful uh?

Go to Setup > Develop > Apex Classes search the EchoManager class and click the WSDL link next to the class name: this way you can download the WSDL file you are going to import in the Local ORG to call the service.

Make sure the remote user you’ll be using (with OAuth2) to consume the service from the Local ORG is enabled to access the Apex Class (from its Profile or assigning a Permission set: if this is an Administrator profile no need to check!).

Last step on this org is to setup a Connected App: this confgiuration will give access to the ORG from outside on behalf of an external application.

Go to Setup > Create > Apps, scroll to the Connected Apps section and click the New button:

Setup a name, a contact Email, a logo image (I choose Master Yoda).

Flag Enable OAuth Setting and set Callback URL to a fake value (e.g. callback://myapp): we’ll be configuring this field later (this hosts the callback url of the Local ORG).

Finally set the full and refresh_token scopes (the last one is necessary to allow for sending refresh token).

Onve you save it can take 5/10 minutes for the changes to be propagated.

This is pretty much what you see now (except for the Callback URL):

Let’s go back to the Local ORG.

Setup the Local ORG

First let’s import the remote service WSDL from Setup > Develop > Apex Classes and click the Generate From WSDL button.

Select the WSDL file just saved from the Remote ORG, use a namespace name (WSEchoManager in my case) and Salesforce will create the Apex Stub.

Let’s create a Visualforce page with a controller to test it:

public class EchoController {
    public String requestText{get;set;}
    public String responseText{get;set;}
    public void sendRequest(){
        this.responseText = null;
        try{
            WSEchoManager.EchoManager stub = new WSEchoManager.EchoManager();
            this.responseText = stub.echo(this.requestText);
        }catch(Exception e){
            this.responseText = 'Unexpected exception :'+e.getMessage();
        }
    }
}

<apex:page controller="EchoController" tabStyle="Account">
    <apex:sectionHeader title="Remote echoes" />
    <apex:form>
        <apex:pageBlock>
            <apex:pageBlockSection columns="2">
                <apex:pageBlockSectionItem>
                    <apex:outputLabel>Say something:</apex:outputLabel>
                    <apex:inputText value="{!requestText}" />
                </apex:pageBlockSectionItem>
                <apex:commandButton value="Send request" action="{!sendRequest}" />
            </apex:pageBlockSection>
            <apex:pageBlockSection columns="1" 
                                   title="Server response" 
                                   rendered="{!NOT(ISBLANK(responseText))}">
                <apex:outputText value="{!responseText}" />
            </apex:pageBlockSection>
        </apex:pageBlock>
    </apex:form>
</apex:page>

Let’s try it:

As expected we haven’t still enabled anything.

Jump to Setup > Security Controls > Auth. Providers and click the New button and choose the Salesforce provider type:

This is the authentication provider will be using to initiate the OAuth 2 dance with the Remote ORG.

In the Consumer Key and Consumer Secret fields set the values from the Remote ORG connected app (called Consumer Key and Secret as well).

The Authorization Endpoint URL and Token Endpoint URL are setup with the https://login.salesforce.com/services/oauth/… values, but in this case I’ve used the Remote ORG custom domain (you can leave with the default values).

In the Default Scopes set the selected scopes in the Remote ORG connected app separated by a blank space (full refresh_token).

Now click “Save” and get the Callback URL you get in the Salesforce Configuration section:

Go back to the Remote ORG connected app and set the Callback URL with the one just copied.

We are about there, don’t worry!

Go back to your Local ORG and go to Setup > Security Controls > Named Credentials and click New.

Give a fantastic name to your named credential (you’ll be using it in your stub class), set the URL with the service url you find in the WSEchoManager class:

 . . .
    public class EchoManager {
        public String endpoint_x = 'https://eu6.salesforce.com/services/Soap/class/EchoManager';
        public Map<String,String> inputHttpHeaders_x;
    . . .

Set the Named Principal Identity Type and the OAuth 2.0 protocol; select the Authentication Provider just configured and flag the Start Authentication Flow on Save: this way, upon saving the named credential, you are requested to access to the remote provider.

Flag Allow Merge Fields in HTTP Body as well in order to put the OAuth token inside the request in a “non standard” way (we dont’ want to use the Authorication: Bearer XXX header).

Cheers: you have a working connection!

Finally we have to change the stub code to recall the named credential:

 . . .
    public class EchoManager {
        public String endpoint_x = 'callout:Echo_Service';
        . . .
        public String echo(String text) {
            WSEchoManager.echo_element request_x = new WSEchoManager.echo_element();
            request_x.text = text;
            this.SessionHeader = new SessionHeader_element();
            this.SessionHeader.sessionId = '{!$Credential.OAuthToken}';
        . . .

We are using the Echo_Service named credential in the endpoint_x member and adding the SessionHeader parameters in the SOAP request using the named credential merge field {!$Credential.OAuthToken}, which stores the token needed to authorize the call.

Thanks to the Allow Merge Fields in HTTP Body the engine replaces automagically this string with the session ID referenced by the merge field inside the SOAP request…and:

You can find the full code in the following Github repository.

Powered by WordPress & Theme by Anders Norén