When Salesforce is life!

Tag: Apex Page 1 of 3

Request Loop: there’s a new free app in (AppExchange) town

A new AppExchange app by WebResults (Engineering Group)

Question: What happens if you put a messy Salesforce MVP in charge of the Innovation Team of WebResults?

Answer: a lot of mess for sure, but also funny stuff!

TL;DR Request Loop is a new free AppExchange app delivered by the Innovation Team from WebResults to help in Salesforce callouts and callins development/debugging.

What is WebResults’ Innovation Team?

I work in WebResults since 2009, when I first moved my steps into the Salesforce world, starting from junior developer till my current position as “Salesforce Solutions” Unit Manager (soon to be called “Innovation Team”).

We are a team of passionate Salesforce professionals who struggle to keep up with the technological changes in the Salesforce ecosystem and try to move our company forward…we are a sort of R&D team.

As far as I’ve seen during the past years, this is not obvious for a big company, whose people are focused on the delivery, to keep a group of people focused on innovation and research…that’s why I’m really happy to do this job!

What do we do?

  • Professional services: sometimes we are called as firefighters by our colleagues when needed to help with difficult tasks or technical issues
  • Innovation tours: we plan meetings with our customers to show off new features or products
  • Knowledge Hub: we try to keep track of diverse Salesforce related knowledge docs and best practices for the benefit of all WebResults
  • Evangelization: we struggle to keep the company technologically engaged and updated
  • Creative app development: is there a problem we have solved in a creative way or that can “cross-project” benefit? let’s package it and create a new app for the whole company and Salesforce Ohana!

Awesome, huh?

What’s Request Loop?

Request Loop has been built to:

  • detect SOAP callouts request body (as you know, Salesforce doesn’t let you get the full body of an Apex SOAP request)
  • simulate REST/SOAP callouts from within Salesforce boundaries (i.e. coming from Salesforce IPs)
  • create a bin that can receive callins from an external system within Salesforce bounds in order to get what’s going on (again, it’s difficult to debug an Apex SOAP callin)
  • Keep everything within Salesforce boundaries (it shoulnd’t be done, but often sandboxes use real data and it’s not good to send business data in unsecure/untrusted clouds)

Request Loop is a free tool meant for developers who want to debug webservice communications both inbound and outbound. This tool has been imagined as a quick disposal package that anyone can install in a DE org or a sandbox (even production but it is unlikely and not suggested to debug directly in production), use until necessary and then uninstall to clean up everything.

This package is composed by 2 features:

  • Request Bin: an inbound Apex webservice that can receive any supported HTTP call (REST or SOAP) and log it for further analysis. This tool can also simulate the response of a valid service (just like the famous Requstb.in online service). Imagine you need to get the SOAP payload of an Apex webservice: no Salesforce tool is available for this porpoise and with Request Loop you can inspect the content message on the fly safely.
  • Request Client: a tool to send outbound callouts from Salesforce to outside systems. This tool can be used to simulate an external system call from within Salesforce to test a service without the need of a complete Apex implementation.

For a detailed configuration guide, have a look at the user manual on the AppExchange listing page.

Request Bin

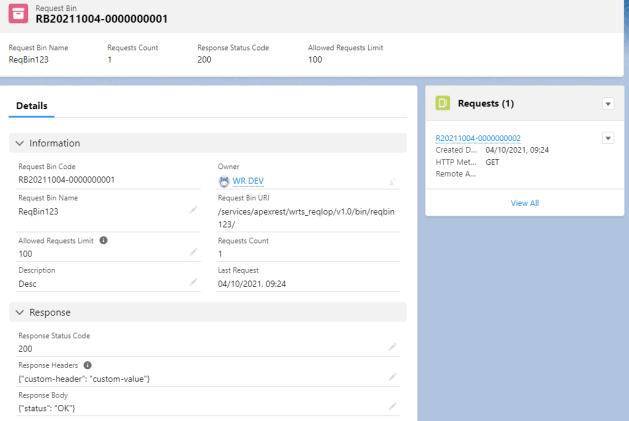
A Request Bin is simply a record on the Request Bin object definition which handles:

  • Request bin’s name (which identifies the service URL to point your external system to)
  • A valid HTTP response code
  • Optional response headers
  • Optional response body
Request Bin configuration

Once you have exposed your bin to the world (by calling the Apex webservice with a valid session token or publishing it inside a public community/site) you can call it from an external system and analyze/debug the requests stored on Request records (request bodies are stored on Files attached to the Request record).

Easy as 1-2-3 or a.b.c…you tell me!

Request Client

Now that we have a configured Request Bin that can take any incoming request, we’ll have a look at the Request Client too that can generate a callout by hand. Click on the Home tab of the Request Loop app:

Request Client example configuration

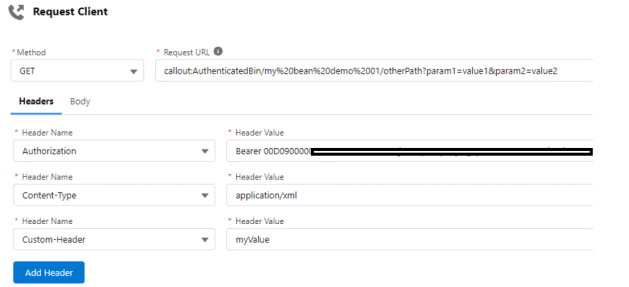
You can configure:

  • Supported HTTP method (Salesforce supports a sub-set of HTTP methods, GET / PATCH / PUT / POST / DELETE)
  • Request URL, which helps you with an autocomplete behavior for Named Credentials, otherwise you can set your own custom URL (remember to add the Remote Site configuration to enable that specific endpoint)
  • Request headers, with an autocomplete features for the main standard headers (the “Content-Type” header has an autocomplete behavior for the value as well, showing the main standard content types)
  • the Request body
Request Body example

Click the Send button and you’ll get response’s body and headers:

Response body
Response headers

Use the Download Body link to download a file with the response body on it.

Finally using the Recent Requests tab you can get a list of the last requests done and send them again (info are stored on the local storage):

List of recent requests made through the Request Client

What are you waiting?

It’s free, useful, safe and easy to install, take a tour and tell us what you think and drop a quick review on the AppExchange!

From WebResults
for the Salesforce Ohana with 💙

Who needs so many records?

Today’s post has been written by Nikos Mitrakis, the creator of Forceea, an amazing Data Factory Framework for Salesforce.
Some facts about Nikos:
– Salesforce Developer at Johnson & Johnson EMEA Development Centre (EDC)
– Started his Salesforce journey in 2014
– Has passed 13 certifications, including Application & System Architect
– Holds a Physics degree
– Married since 1994, has a daughter
– Loves watching sci-fi movies and good comedies
– Lives in Limerick, Ireland


A first question you probably have when you read about creating millions of records is “Who really needs to create millions of records?” Sometimes it’s not “millions”; it’s anything between a few thousands to hundreds of thousands of records. But the need is the same: a flexible tool that can insert (and delete of course) many SObject records and will allow:

  • Companies of any size create sandboxes for User Acceptance Testing (UAT).
  • AppExchange ISV/Consulting partners create orgs with sample data for demos or for a realistic simulation of their app.
  • Testers or business users generate their testing data in a sandbox.
  • Architects create Large Data Volumes (LDV) for stress testing of their designs.

Forceea overview

Forceea data factory (a GitHub project) can create data using the Dadela data generation language. The framework can insert/update records synchronously for test methods (or for inserting a few hundreds of records) in your org, but it can also insert/delete records asynchronously.

Forceea has a rich set of powerful data generation tools and it’s the most sophisticated data factory for Salesforce. The latest release adds variables, permutations of serial values and the first function-x definition.

I can hear you asking: “How complex (or “difficult”) is to create records with Forceea asynchronously? Should I know to write code?

The answer is “Yes, you should write a few lines of Apex code. But, NO, it’s not difficult at all!”. Sometimes the data creation is complex because we must have a deep knowledge of how our SObjects are related to each other, but this doesn’t need advanced programming skills.

So, what is needed to start working with it?

  • A Template.
  • An anonymous window to execute Apex scripts.
  • A Lightning component to monitor the progress.

Let’s start with..

The Template

In my previous article How to create an Apex reusable Data Factory Library using Forceea Templates, we had constructed some Templates using an older version of Forceea. The good news is that Forceea now inherently supports Templates, so the Template creation process is simpler.

What is a Template

A Template will not create data; it’s a “description” of the structure of the data we want to create.

When we construct a Template we define:

  • The SObjects that will be created.
  • The number of records of each SObject.
  • What fields will be populated.
  • The structure of field values.

A Template is a Map<String, FObject>, so our Template will start with the initialization of this Map:

Map<String, FObject> template = new Map<String, FObject>();

Defining what data we need

Before starting our Template we should have a good understanding of the SObjects and fields we need, what are the relationships between the SObjects and what data we want for each field.

Here are our (hypothetical) requirements:

Accounts

  • Record type: the record type with name MajorAccount.
  • Name: Account-1, Account-2, etc.
  • Industry: any picklist value except Banking and Services.
  • AnnualRevenue: a random integer number between 1M and 10M.
  • Rating: any picklist value.
  • Type: any random value between Prospect, Customer and Analyst.
  • Shipping address: any (real) address from U.S.

Opportunities

  • Record type: the record type with name BigOpp.
  • Name: <Account> – <text>, where <Account> is the name of the related account and <text> is a text of random words between 20 and 40 chars.
  • Amount: a random number between 10K and 1M, rounded to nearest 100.
  • StageName: any picklist value except Closed Won and Closed Lost.
  • Type: New Business.
  • CloseDate: any date between 1 Jan. 2020 and 30 June 2020.
  • AccountId: the 1st account to the 1st opportunity, the 2nd account to the 2nd opportunity and so on. If we have no more accounts, start from the 1st account, then to the 2nd, etc.

For every 1 account we’re going to create 10 opportunities.

The template for accounts

First, we “add” the Account definitions in our template:

template.put('Accounts', new FObject(Account.SObjectType)
  .setNumberOfRecords(10)
  .setDefinition(Account.Name, 'static value(Account-)')
  .setDefinition(Account.Name, 'serial type(number) from(1) step(1) scale(0)')
  .setDefinition(Account.Industry, 'random type(picklist) except(Banking,Services)')
  .setDefinition(Account.AnnualRevenue, 'random type(number) from(1000000) to(10000000) scale(0)')
  .setDefinition(Account.Rating, 'random type(picklist)')
  .setDefinition(Account.Type, 'random type(list) value(Prospect,Customer,Analyst)')
  .setDefinition(Account.ShippingStreet, 'random type(street) group(shipping)')
  .setDefinition(Account.ShippingPostalCode, 'random type(postalCode) group(shipping)')
  .setDefinition(Account.ShippingCity, 'random type(city) group(shipping)')
  .setDefinition(Account.ShippingState, 'random type(state) group(shipping)')
  .setDefinition(Account.ShippingCountry, 'random type(country) group(shipping)')
);
  • The order of the field definitions is important! Forceea generates the values for the first field definition, then for the second, etc.
  • The Name field has 2 definitions. The first generates the same (static) value “Account-” and the second serial numbers (1,2,3,..)
  • We “grouped” all address definitions in order to “link” the correct street to the correct city, postal cod, etc.
  • If we had a Billing address, we could copy the value from the Shipping, e.g. setDefinition(Account.BillingCity, 'copy field(ShippingCity)')

The Template for opportunities

Now we are going to set the Opportunity definitions:

template.put('Opportunitites', new FObject(Opportunity.SObjectType)
  .setNumberOfRecords(100)
  .setDefinition(Opportunity.AccountId, 'serial lookup(Account) mode(cyclical) source(forceea)')
  .setDefinition(Opportunity.Name, 'copy field(AccountId) from(Account.Name)')
  .setDefinition(Opportunity.Name, 'static value(" - ")')
  .setDefinition(Opportunity.Name, 'random type(text) minLength(20) maxLength(40)')
  .setDefinition(Opportunity.Amount, 'random type(number) from(10000) to(1000000) scale(2)')
  .setDefinition(Opportunity.StageName, 'random type(picklist) except(Closed Won,Closed Lost)')
  .setDefinition(Opportunity.Type, 'static value(New Business)')
  .setDefinition(Opportunity.CloseDate, 'random type(date) from(2020-01-01) to(2020-6-30)')
);

The FObjectAsync class

Now we can proceed with the actual insertion of records. Our main tool is the FObjectAsync class.

How the async process works

When we insert or delete records asynchronously, Forceea uses Queueable Apex to execute one or more jobs. These jobs have some higher governor limits (e.g. 60,000ms total CPU time and 200 SOQL queries), which is definitely positive for our data generation needs.

If you think “I’m going to create x accounts and y opportunities”, forget this way. Forceea works with iterations! An iteration is the number of records (for each SObject) defined in the Template we use. Our template creates 10 accounts and 100 opportunities, so 1 iteration will create 10 accounts and 100 opportunities.

Another important detail is Partitioning, which has two parts:

  • Template: you define the Partition field for each SObject with the method setPartitionFieldName.
  • FObjectAsync: you define the Partition field value for all SObjects with the method setPartitionFieldValue.

The Partition field value should be a string which will identify (or “partition”) the inserted records. As a best practice, use a value with a few characters, even a single letter (uppercase or lowercase).

When inserting records, Forceea checks:

  • If there is a Partition field defined in each SObject.
  • If there is a Partition field value.

If both conditions are valid, Forceea will insert the value in the partition field of each record. So, let’s say that the Partition field for Account is ForceeaPartition__c and the Partition field value is df. In this case, Forceea will insert the value:
df1 into the records inserted in Job 1.
df2 into the records inserted in Job 2.
df3 into the records inserted in Job 3.
etc.

Insert records asynchronously

Now we are going to insert 1,000 iterations, so we’ll insert 1,000 x 10 = 10K accounts and 1,000 x 100 = 100K opportunities.

Open an Anonymous Apex window and enter the following lines:

new FObjectAsync(template)
    .setNumberOfIterations(1000)
    .setNumberOfJobs(20)
    .setPartitionFieldValue('df')
    .insertRecords();
  • The default number of (parallel asynchronous) jobs is 30. Here we require 20 jobs.
  • The partition value is “df”.

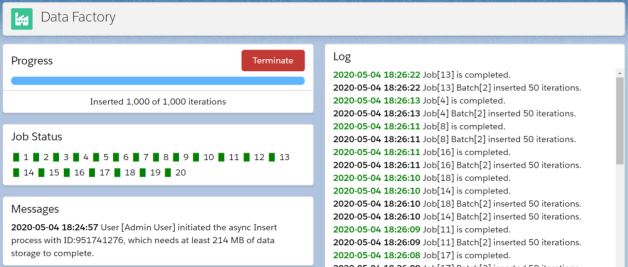
Execute the code and then go to the Data Factory tab of the Forceea Lightning app.

  • In the Log panel Forceea displays information about the execution of each job.
  • The Messages panel contains an overview of the async process.
  • The Progress panel will let you know how many iteration have been inserted.
  • Finally, the Job Status panel displays a visual indication of the status for each job (black: pending, green: successful, red: failure, orange: terminated).

Forceea will follow this procedure during the async insertion process:

  • Benchmarks the operation by inserting 1 iteration in the first batch. The transaction is rolled back, so it doesn’t permanently insert any records.
  • Executes the second batch of any job, which creates and insert records of each SObject defined in the Template, with as many iterations as possible (remember the benchmarking).
  • If there are no errors and there are more iterations to be inserted, a third batch is created, and so on.
  • When all iterations assigned to a job have been inserted, the job ends with a successful completion.

When we have a serial definition, Forceea will insert the records without any gaps in the serialization!

Delete records asynchronously

The deletion process follows almost the same logic:

new FObjectAsync(template)
    .setNumberOfJobs(20)
    .setPartitionFieldValue('df')
    .deleteRecords();

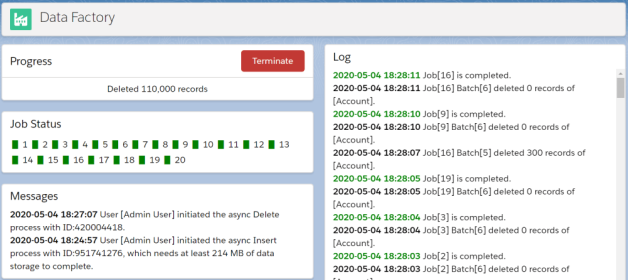
Execute the above Apex code and then go to the Data Factory tab to watch the progress.

Forceea will follow these steps during the async deletion process:

  • Reverses the order of SObjects in the Template, so the last SObject will get the first position, etc.
  • If all SObjects in the Template have a Partition field and FObjectAsync has a Partition field value, a number of jobs are enqueued for parallel processing (each job will delete all records of different partitions), otherwise it enqueues only 1 job (no partitioning).
  • The deletion starts from the SObject in the first position, executing the first batch of each job, which benchmarks the transaction to calculate the maximum number of records that can be deleted in every batch. This first benchmarking batch deletes up to 200 records.
  • If there are no errors and there are more records to be deleted, a second batch is created after the completion of the first batch, and so on.
  • When all SObject records assigned to a job have been deleted, the job moves to the second SObject, etc.

Important: if Forceea finds in the Template a definition for the RecordTypeId field of an SObject, it will delete the records of this Record Type only.

Forceea will stop the execution of a job when an error is encountered, except from the errors related to record locking, where it will raise an error only after the 5th occurrence of the UNABLE_TO_LOCK_ROW error.

Using existing lookup records

Forceea will take care of all the complex orchestration of the asynchronous process. The parallel processing offers an advantage, but it’s based on the assumption that we won’t query any existing records from the database, otherwise we may have record locking.

For example, if we have a custom SObject Language__c and we have the lookup field Language__c on Opportunity, to get random IDs for this field we would use:

setDefinition(Opportunity.Language__c, 'random lookup(Language__c) source(salesforce)')

If the above definition raises the UNABLE_TO_LOCK_ROW error (unable to obtain exclusive access to this record), then your only option is to use 1 job only with setNumberOfJobs(1).

Conclusion

Nobody can say that data generation is simple or without issues. Under the hood, the data generation process is quite complex, but it shouldn’t be to the user; Forceea will gracefully handle all the complexity.

I strongly believe that an admin, a tester or even a business user, with no Apex knowledge, can insert/delete records asynchronously using FObjectAsync and existing Templates, which a developer or advanced admin could create.

You can find the code of the above scripts in Forceea-training GitHub repo. And don’t forget to read the Forceea Success Guide; it has a lot of examples and details.

How to create an Apex reusable Data Factory Library using Forceea Templates

Today’s post has been written by Nikos Mitrakis, the creator of Forceea, an amazing Data Factory Framework for Salesforce.

Some facts about Nikos:

– Salesforce Developer at Johnson & Johnson EMEA Development Centre (EDC)
– Started his Salesforce journey in 2014
– Has passed 10 certifications, including Certified Application Architect
– Holds a Physics degree
– Leader of Limerick, Ireland Developer Group
– Married since 1994, has a daughter
– Loves watching sci-fi movies and good comedies
– Lives in Limerick, Ireland


Introduction to a familiar situation

Let’s face it with honesty and courage: writing test methods for our Apex code is (very often) boring and time-consuming, usually because of the difficulty regarding the creation of test data. In most implementations we can see a mediocre result, which could be described as a class (e.g. DataFactory) including static methods that generate and insert SObject records. The following code describes this inefficient pattern:

public class DataFactory {
    public static List<Account> createAccounts(Integer numRecords) {
        List<Account> results = new List<Account>();
        for (Integer counter = 1; counter <= numRecords; counter++) {
            Account record = new Account();
            // define fields
            record.Name = ...
            ...
            results.add(record);
        }
        return results;
    }
    // other methods
}

Using this logic, we can execute our Data Factory method with:

List<Account> accounts = DataFactory.createAccounts(100);
insert accounts;

to create and insert 100 accounts. As you can see, one issue here is how we generate data for other fields in our test method. But things get worse when we create related SObjects, for example contacts with accounts. Let’s examine a new method createContacts, based on the previous pattern:

public static List<Contact> createContacts(Integer numRecords) {
    List<Account> accounts = createAccounts(10);
    // optionally process accounts and manually add/modify Account fields
    insert accounts;
    List<Contact> results = new List<Contact>();
    for (Integer counter = 1; counter <= numRecords; counter++) {
        Contact record = new Contact();
        // define fields
        record.LastName = ...
        record.AccountId = ... // get the ID from accounts list
        ...
        results.add(record);
    }
    return results;
}

When we call the above method from our test method, e.g. with

List<Contact> contacts = DataFactory.createContacts(100);
//  optionally process contacts and manually add/modify Contact fields
insert contacts;

we certainly insert 10 accounts and 100 contacts related to these accounts. But what if we need to modify the generated accounts or we need to insert additional Account fields? This pattern doesn’t allow to do this. In more complex scenarios, we may have to insert many more SObjects. The final result is a Data Factory class with methods that create test data BUT without the ability to easily modify the created records.

I can finally hear your question: Do you propose a better approach? Is there a more flexible and easier way to do it? And the answer is YES!

Making a Data Factory Library with Forceea Templates

Forceea Data Factory framework is an open source GitHub project, with the following capabilities:

  • creates records for standard or custom objects, for any standard or custom field
  • automatically definines the required fields
  • creates static or random data for fields of any data type: Integer, Currency, Double, Date, Datetime, Time, Boolean, String, TextArea, Percent, Reference, Email, Phone, URL, Base64 (BLOB), Picklist and MultiPicklist
  • creates real random first and last names
  • creates real random addresses with street, zip code, city, region/state and country
  • creates serial data for date, datetime, integer, decimal, currency and percent
  • can copy data from another field of the same record or a lookup record
  • can create the same random data, using a pseudo-random number generator
  • handles record types and field dependencies (dependent picklists)
  • supports record groups for inserting and deleting records
  • validates the definitions based on the field data type
  • provides many methods to get/insert the created records, add/delete field definitions, get the errors, configure the amount of information returned during run-time (debug log) and more
  • includes an extended error messaging system

and will be our main tool to build a powerful and flexible DataFactory class (our Data Factory Library). This class will include static methods, our Templates, which actually will not insert any data at all! What these Templates do is to instruct Forceea how to generate the data.

Let’s meet our first Template:

public class DataFactory {
    // returns definitions for: Accounts 
    public static FObject getDefAccounts() {
        FObject result = new FObject('Account');
        result.setDefinition('Name', 'static value(Company)');
        result.setDefinition('Name', 'serial type(number) from(1) step(1) scale(0)');
        result.setDefinition('Phone', 'random type(phone) format("(30) DDD dD-00-DD")');
        result.setDefinition('Industry', 'random type(picklist)');
        result.setDefinition('Site', 'random type(url)');
        return result;
    }
}

Obviously the method getDefAccounts returns an FObject – the class instance for generating data with Forceea. Reading the code you can see that we define accounts with random values for all required fields. So, these are our guidelines so far:

  • Create a DataFactory class
  • Create a master Template for each SObject, with the name getDef<SObjectApiName>s, e.g. getDefCases
  • Use the above pattern for each master Template, defining all common required fields (the fields required by any record type)
  • For the Template field definitions, use definitions which generate
    – random values for picklist fields
    – random values for fields with date/datetime, checkbox, email, phone, currency, percent, address, and text area data types
    – serial values for the Name field (notice how we did it in the getDefAccounts method)

Even though it’s not obvious from the above code, Forceea (by default) will find and insert field definitions for any required fields we haven’t defined, but it’s a best practice to define all these required fields in our master Template.

The setDefinition method sets the expected values for each field, using a descriptive data generation language called Dadela. For example, the definition random type(picklist) except(Hot) for the Rating field generates random values from the pisklist field’s values, excluding the value “Hot”.

Now, for every record type of each SObject create a new Template, for example:

// returns definitions for: Accounts with MediumAccount record type
public static FObject getDefMediumAccounts() {
    FObject result = getDefAccounts();
    result.setDefinition('RecordTypeId', 'static value(MediumAccount)');
    result.setDefinition('NumberOfEmployees', 'random type(number) from(10) to(100) scale(-1)');
    result.setDefinition('AnnualRevenue', 'random type(number) from(1000000) to(10000000) scale(3)');
    return result;
}

This new Template builds on the master Template getDefAccounts, defining only the record type and the additional fields which are related to this specific record type (NumberOfEmployees and AnnualRevenue). All other defined fields from the master Template are used as they are, so we don’t duplicate any field definitions. Our additional guideline:

  • Create a record type Template for each SObject’s record type, with the name getDef<RecordTypeDescription><SObjectApiName>s, e.g. getDefServiceCases

This is it! This is what we need to do for SObjects which don’t include a Lookup or Master-detail relationship. But how do we create templates for those SObjects that they do include a relationship? Let’s see how, with our second SObject:

// returns definitions for: Accounts - Contacts
public static Map<String, FObject> getDefContactsAndAccounts() {
    // initialize
    Map<String, FObject> fobjectsByName = new Map<String, FObject>();
    String objName = '';
    // Account
    objName = 'Account';
    FObject objAccount = getDefMediumAccounts(); 
    fobjectsByName.put(objName, objAccount);
    // Contact
    objName = 'Contact';
    FObject objContact = new FObject(objName);
    objContact.setDefinition('FirstName', 'random type(firstname) group(name)');
    objContact.setDefinition('LastName', 'random type(lastname) group(name)');
    objContact.setDefinition('AccountId', 'random lookup(Account) source(forceea)');
    objContact.setDefinition('LeadSource', 'random type(picklist)');
    objContact.setDefinition('Title', 'random type(list) value(Developer, CFO, Account Manager, CEO, Logistics Manager)');
    objContact.setDefinition('Email', 'random type(email)');
    fobjectsByName.put(objName, objContact);

    return fobjectsByName;
 }

I think you’ll agree that this Template is more interesting. Its first lines use the previously created record type Template getDefMediumAccounts to define the Account fields. We could also

  • insert one or more new field definitions using objAccount.setDefinition('FieldApiName', '<Field Definition>') before fobjectsByName.put(..) or
  • modify an existing field definition – for example to define a static value for the (existing) NumberOfEmployees field, we can use
    // delete previous field definitions
    objAccount.deleteFieldDefinitions('NumberOfEmployees');
    // add new definition
    objAccount.setDefinition('NumberOfEmployees', 'static value(100)');

Finally, we insert the FObject for the Account into the fobjectsByName map and we proceed to the field definitions for contacts.

If you noticed the definition objContact.setDefinition('AccountId', 'random lookup(Account) source(forceea)' and asked yourself what is source(forceea), this is a way to request that the framework will get the related account IDs from the previously inserted accounts. There are a lot of lookup field definitions that will certainly need your attention if you start developing with the framework, but for the moment let’s not go any deeper.

In many implementations we have a set of dependent SObjects. Let’s say that in order to create records for the Case, we have to create records for Account and Contact (and perhaps records for 4 more other SObjects) using a Template like getDefCasesAndAccountsContacts. This is a kind of quite complex data factory process, which can be handled by Forceea very smoothly – you just add the following pattern for each requird SObject:

objName = '<SObjectApiName>';
FObject objMySObject = new FObject(objName);
objMySObject.setDefinition('<FieldApiName>', '<Field Definition>');
// other required field definitions
fobjectsByName.put(objName, objMySObject);

Our last guidelines:

  • Document the SObjects that are returned by any Template, with the correct order, e.g. // returns definitions for: Accounts - Contacts - Cases
  • Use the format getDef<SObjectName>And<RelatedSObjects> for Templates with related SObjects, e.g. getDefCasesAndAccountsContacts

Finally, insert the following method in your DataFactory class:

public static void insertRecords(Map<String, Fobject> fobjects) {
    for (FObject obj: fobjects.values()) {
      obj.insertRecords(true);
    }
}

The test method

After you have created your Templates, let’s see how you can take full advantage of them. We’ll use getDefContactsAndAccounts as an example. In your test method, the first step is to define a map:

Map<String, FObject> fObjects = DataFactory.getContactsAndAccounts();

The second step is to modify any SObject definitions, if it’s needed. For our example here, we’ll make things a little more difficult with the following requirements:

  • For the Account: we need to insert 10 records, with a) random values for the Description field and b) any picklist value except “Hot” for the Rating field.
  • For the Contact: we need to insert 100 records, with the random values from 1/1/1960 to 31/12/2000 for the Birthdate field.
  • All other fields will get the default definitions from the their Templates.
// initialize
Map<String, FObject> fobjectsByName = DataFactory.getDefContactsAndAccounts();
FObject objAccount = fobjectsByName.get('Account');
FObject objContact = fobjectsByName.get('Contact');
// define number of records
objAccount.records = 10;
objContact.records = 100;
// optionally modify an existing definition
objAccount.deleteFieldDefinitions('Rating');
//  optionally define new field definitions
objAccount.setDefinition('Description', 'random type(text) minlength(10) maxlength(40)');
objAccount.setDefinition('Rating', 'random type(picklist) except(Hot)');
objContact.setDefinition('Birthdate', 'random type(date) from(1960-1-1) to(2000-12-31)');
// insert records
DataFactory.insertRecords(fobjectsByName);

Using the above pattern, it’s easy for everyone to understand what changes have been made in comparison to the getDefContactsAndAccounts Template.

Did you say that we need the inserted contacts for our System.assert? No problem at all! Just use:

List<Contact> contacts = objContact.getInsertedRecords();
OR
List<Contact> contacts = FObject.getInsertedRecords('Contact');

Conclusion

Forceea Templates are easy to implement and they are powerful enough to help you write your Apex test methods faster. The most important is that

  • your test methods will be more understandable by any other developer, and
  • the new test methods will require less effort to develop

The best way to see if this solution is suitable for you is to start working with it and create a pilot version of your new DataFactory class. If you’re not satisfied with your existing Data Factory (or if you don’t have a Data Factory at all), why don’t you give it a try?

[Salesforce] Handle encryption and decryption with Apex Crypto class and CrypoJS

One of the easiest Javascript libraries for encryption I usually adopt is CryptoJS, quick setup and good support for most algorithms.

But I got an headache trying to make it talk with Salesforce, this was due to my relatively low encryption-topics training but also to a specific way Salesforce handles encryption.

I was surprised that none has ever had the same need before.

I’m not going to explain how I came up to this solution (one of the reasons is that I already forgot it…as I always say, my brain is a cool CPU but with a low amount of storage), but I’ll just give you the way I solved encrypted data exchange between a Javascript script (whether it is client or server side) and Salesforce.

In Apex encrypting and decrypting a string is quite easy:

//encrypt
String algorithmName = 'AES256';
Blob privateKey = Crypto.generateAesKey(256);
Blob clearText = Blob.valueOf('Encrypt this!');
Blob encr = Crypto.encryptWithManagedIV(algorithmName, privateKey, clearText);
system.debug('## ' + EncodingUtil.base64encode(encr));
//decrypt
Blob decr = Crypto.decryptWithManagedIV(algorithmName, privateKey, encr );
System.debug('## ' + decr.toString());

This could be an example of the output:

## Lg0eJXbDvxNfLcFMwJm6CkFtxy4pWgkmanTvKLcTttQ=
## Encrypt this!

For encryption noobs out there, the encrypted string changes every time you run the script.

The string if first encrypted with the AES256 algorithm and then decrypted using the same secret key (generated automatically by Salesforce).

All is done through Crypto class’ methods:


Valid values for algorithmName
are:

– AES128
– AES192
– AES256

These are all industry standard Advanced Encryption Standard (AES) algorithms with different size keys. They use cipher block chaining (CBC) and PKCS5 padding.

Salesforce HELP

PKCS5 padding is a subset of the more general PKCS7, that is supported by CryptJS, so it still works.

The only thing that is not clearly stated here (at least for my low storage brain) is that this method uses an Initialization Vector (IV, that is used together with the private key to generate the proper encryption iterations) which has a fixed 16 Bytes length.

Also, the IV is included within the encrypted string: this is the key point.

To encrypt and decrypt using the following method the CryptoJS must be aware of the first 16 Bytes of the IV and append it to (if we are encrypting from JS to Salesforce) or extract it from (if we are decrypting in JS from a Salesforce encrypted string) the encrypted string.

This is what I came up with after a bit of research (you have to deal with binary data when encrypting, that’s why we use Base64 to exchange keys and encrypted strings).

//from https://gist.github.com/darmie/e39373ee0a0f62715f3d2381bc1f0974
var base64ToArrayBuffer = function(base64) {
    var binary_string =  atob(base64);
    var len = binary_string.length;
    var bytes = new Uint8Array( len );
    for (var i = 0; i < len; i++)        {
        bytes[i] = binary_string.charCodeAt(i);
    }
    return bytes.buffer;
};
//from //https://gist.github.com/72lions/4528834
var appendBuffer: function(buffer1, buffer2) {
    var tmp = new Uint8Array(buffer1.byteLength + buffer2.byteLength);
    tmp.set(new Uint8Array(buffer1), 0);
    tmp.set(new Uint8Array(buffer2), buffer1.byteLength);
    return tmp.buffer;
};
//from //https://stackoverflow.com/questions/9267899/arraybuffer-to-base64-encoded-string
var arrayBufferToBase64 = function( arrayBuffer ) {
    return btoa(
        new Uint8Array(arrayBuffer)
            .reduce(function(data, byte){
                 return data + String.fromCharCode(byte)
            }, 
        '')
    );
},
//Encrypts the message with the given secret (Base64 encoded)
var encryptForSalesforce = function(msg, base64Secret){
    var iv = CryptoJS.lib.WordArray.random(16);
    var aes_options = { 
        mode: CryptoJS.mode.CBC,
        padding: CryptoJS.pad.Pkcs7,
        iv: iv
    };
    var encryptionObj  = CryptoJS.AES.encrypt(
        msg,
        CryptoJS.enc.Base64.parse(base64Secret),
        aes_options);
    //created a unique base64 string with  "IV+EncryptedString"
    var encryptedBuffer = base64ToArrayBuffer(encryptionObj.toString());
    var ivBuffer = base64ToArrayBuffer((encryptionObj.iv.toString(CryptoJS.enc.Base64)));
    var finalBuffer = appendBuffer(ivBuffer, encryptedBuffer);
    return arrayBufferToBase64(finalBuffer);
};
//Decrypts the string with the given secret (both params are Base64 encoded)
var decryptFromSalesforce = function(encryptedBase64, base64Secret){
    //gets the IV from the encrypted string
    var arrayBuffer = base64ToArrayBuffer(encryptedBase64);
    var iv = CryptoJS.enc.Base64.parse(arrayBufferToBase64(arrayBuffer.slice(0,16)));
    var encryptedStr = arrayBufferToBase64(arrayBuffer.slice(16, arrayBuffer.byteLength));

    var aes_options = { 
        iv: iv,
        mode: CryptoJS.mode.CBC
    };

    var decryptObj  = CryptoJS.AES.decrypt(
        encryptedStr,
        CryptoJS.enc.Base64.parse(base64Secret),
        aes_options
    );

    return decryptObj.toString(CryptoJS.enc.Utf8);
};

By sharing the Base64 of the Salesforce generated secret (using the method Crypto.generateAesKey(256) ) between your JS client and Salesforce, you can store and exchange encrypted data with a blink of an eye.

[Salesforce / Apex] Handling constants on classes

Few days ago I was thinking about optimizing the use of constants (usually of String type) inside projects to avoid proliferation of public static final String declarations on various classes (with a limited control over duplicates) but giving at the same time developers a way to increase readability of constants in their code.

The reason for this post is that I want to know your opinion on this strategy, that on my eyes appear elegant and clear but may bring some drawbacks.

public class Constants{ 
	private static ObjectName_Constants objectNameConstants; 

	public static ObjectName_Constants ObjectName{  
		get { 
			if(objectNameConstants == null){ 
				objectNameConstants = new ObjectName_Constants(); 
			} 
			return objectNameConstants; 
		} 
	} 

	public class ObjectName_Constants{ 
		public String CustomField_AValue  { get { return 'aValue'; } } 
		public String RecordType_ADevName  { get { return 'aDevName'; } } 
	} 
} 

The class is basically shaped as follows:

This brings to a cool looking:

String myDevName = Constants.ObjectName.RecordType_ADevName;

This way we have the following pros:

  • Clear hirearchy for constants
  • More readable constants names (they are all getters but are used as constants, so no need for upper case)
  • Heap space is allocated on constants only if they are actually used
  • Centralized place for common constants

And these are the cons:

  • More quantity of Apex used to write a constants

I’m curious to get some feedbacks.

[Salesforce / Apex] Forceea data factory framework: a new approach to an old problem

This week’s guest post is a cool technical post about Apex Tests by Nikos Mitrakis.

Apex Tests are perceived as the hated necessity by most Salesforce developers: they are really important to keep high code quality levels but they are not the most fun part of coding with Salesforce.

I casually discovered Nikos through his GitHub page: I had a read at this Forceea Apex Test Framework, and I asked him to write a post to describe this cool piece of Salesforce tech.

Nikos has started his Salesforce journey in 2014. He started with Salesforce as a hobby (which still remains) and his wife continously threatens him with divorce if he doesn’t stop playing with his various Orgs all the time.
He has a Physics degree, a Microsoft SQL Server BI certification and a few Salesforce certifications. He likes writing code and discoverig how huge the Salesforce ecosystem is. He adores talking about his personal projects, he likes good sci-fi films, he’s been working with a Mac for more than a year, and he started the Salesforce Developer Group in Greece in 2016 (admittedly without much success).
Nikos is working as a Salesforce Developer at the Johnson & Johnson EMEA Development Center in Ireland. If he wasn’t a Salesforce Developer, he’d like to be a Developer in Salesforce.


What is a Data Factory?

Generally speaking, a Data Factory is a set of tools that generate and insert data. It’s very important when you develop a test method in an Apex Test Class, since you usually have to insert records to complete the testing. Using a Data Factory you make your life easier and your work more productive!

A Data Factory is also required when you want to test a report, a trigger/class or another process under Large Data Volumes (e.g. how fast is our report when there are 1 million records?), for User Acceptance testing (UAT), and for training – when you don’t want to create a Full Sandbox or when you want to create data which don’t exist in the production system yet.

What is Forceea and how I can install it?

Forceea (forˈsēa) is a data factory framework for Salesforce and an open source project (https://github.com/nmitrakis/Forceea) in GitHub. It’s a framework, because it gives the programmatic tools for a developer (or administrator, why not?) to easily generate, insert and delete SObject records.

“Yet another data factory?” you may say. Well, not at all!

But first let’s see how you install it.

When you download the files, your installation depends on your preference: classic metadata or DX? For the first option, you may want use the Ant (the build files are included) or the CLI, for example with

sfdx force:mdapi:deploy -u <OrgAlias> -d <folder> -w 5).

For DX, I suggest the CLI, using the command

 sfdx force:source:push -u <OrgAlias>

How can I generate the data I want?

OK, you have installed the framework. Now what?

I think the better way to understand how it works is by example: suppose you want to insert 100 Opportunity records and in your Org the Opportunity object has the additional required custom field MyField__c (which is a lookup to the custom object MyObject__c). Of course the Opportunity has its own required fields (like Stage).

The first step is to create an FObject:

FObject myObj = new FObject(Opportunity, 100);

Next, you declare the field definitions. A field definition uses a descriptive “language” to define what kind of data you want to create for this particular field. This language is called SDDL (Sample Data Definition Language). Don’t be afraid! It’s not a new programming language and it’s very easy to learn.

Let’s start with the first field you want to define, which is the Record Type (API name: RecordTypeId). Do you want your records to have a specific record type (let’s say BigDeal)? Then give this field definition:

myObj.setDefinition('RecordTypeId', 'static value(BigDeal)');

static here is the command and value is the parameter. The static command creates (what else?) static values, that is values which are the same in every record you create.

Do you want a random record type? Then you need the following definition:

obj.setDefinition('RecordTypeId', 'random type(picklist)');

The random command does exactly what you understood, it’s a really powerful command and you can even decide that every time you get the same (but random) data!

But wait! I hear you saying that the Record Type field is not a picklist field, and of course you’re right (it’s a Lookup)! Forceea handles this “special” field as a picklist field, making things easier for you. Say “Thank you 4ca”..

So, we move to our next field, which is the Close Date (API name CloseDate). This has a Date type, and let’s suppose you want it to have random Date values from this year:

myObj.setDefinition('CloseDate', 'random type(date) from(2018-01-01) to(2018-12-31)');

The type parameter is the boss here – it defines what kind of data you get. Give type(Boolean) and you get random True/False values. Give type(phone) and you have random phone numbers, etc

The Amount is a currency, so you decide to take random values from 100,000 to 1,000,000 and round these values to the nearest thousand. Difficult? No, it’s very easy!

myObj.setDefinition('Amount', 'random type(number) from(100000) to(1000000) scale(-3)');

Every opportunity that respect’s itself should have an Account, so you decide that the AccountId field will take an ID from any random Account, but you’ll get accounts without two specific Industry values. You asked for it, you get it:

myObj.setDefinition('AccountId', 'random lookup(Account) field(Industry) except(Banking,Chemicals) source(forceea)

I think the above definition needs some clarifications. The lookup(Account) instructs the framework to fetch records from the Account object and the field(Industry) except(…) to get only records for which the Industry field has any value except “Banking” and “Chemicals”.

But what is source(forceea)? This parameter defines the “source” of the lookup object’s records:

  • If it’s source(salesforce), the framework will query the Salesforce database and get the lookup records.
  • If it’s source(forceea) and the lookup object has been previously created (in the same context/transaction), it gets the records from there (which of course is much faster).
  • If it’s source(forceea) and the lookup object hasn’t been created (or the records have been inserted and deleted), it inserts some records of this lookup object.

Now that you have the opportunity account, don’t forget the opportunity Name (API name Name). Let’ say you want it to have the format <AccountName> – Opportunity for <Random text (with words) from 15 to 30 chars>

So, what is our definition? Well, we don’t have one, but 3 definitions to deliver this:

myObj.setDefinition('Name', 'copy field(AccountId) from(Account.Name)');

This definition gets the Name of the related account.

myObj.setDefinition('Name', 'static value(" – Opportunity for ")');

As you see, this is just a simple text value.

myObj.setDefinition('Name', 'random type(text) minlength(15) maxlength(30)');

And finally, we get our random text with “Latinoid” random words, like “Partem inermis ius impedit eam”

Keep in mind that with the random type(text) definition, the first character of the text is always a capital and the same word is never repeated twice in a row.

Your next field is Lead Source (which is a picklist field with the API name LeadSource), and here you want to have any declared picklist value except from “Partner” and “Other”:

myObj.setDefinition('LeadSource', 'random type(picklist) except(Partner, Other)');

If you wanted these two values only, you could give the definition:

myObj.setDefinition('LeadSource', 'random type(list) value(Partner, Other)');

or if you needed just a specific picklist value:

myObj.setDefinition('LeadSource', 'static value(Partner)');

Now you’ve finished with your field definitions, but remember that we haven’t defined all required fields (like Stage or myField__c). Of course you don’t have to worry about that, because the framework automatically identifies and defines all required fields. There are specific rules for setting the suitable field definition, but (without going to many details) we could briefly say that the field definition for a required field depends on the field data type, the SObject and the field name. So, after defining your fields, Forceea will define all required fields you didn’t define, like Stage or myField__c.

If you need to make some changes in the created records (for example to update a field with some complex calculations), you can get the opportunities with:

List<Opportunity> myRecords = (List<Opportunity>) myObj.getRecords();

Then do your changes, e.g.

for (Opportunity objRecord : myRecords) {
 objRecord.Amount = … // your changes here
}

and just insert the amended records with

myObj.insertRecords(true);

Forceea has many other field definitions, to create random real first and last names (with male and female names), real postal addresses (address, city, postal code, state, country), URLs, email addresses, phone numbers, Boolean values and Datetime values. And don’t forget that it supports BLOBs (e.g. to create email attachments).

It also provides definitions with the serial command (e.g. serial type(number) from(1) step(1.5) scale(2)) to create serial integer, decimal, currency, percentage, date and datetime values.

As you understand, there are many methods to

  • get or delete field definitions
  • create records from a specific serial number (very useful when you insert records with the serial command in different transactions)
  • insert records in groups (a valuable tool for your test methods)
  • define the Verbose mode (how many debug logs you get)
  • get the errors (yes, there is a detailed error system)

The framework handles field dependencies (dependent picklists) and it protects you from doing errors like defining the wrong definition for a specific field data type or defining multiple definitions for a field (e.g. Date) which can have only one.

How can I see the framework’s messages?

Forceea doesn’t have a UI (for the moment). The framework uses Debug Log to post its messages, which show

  • The errors during the process
  • The process milestones completed
  • The data of the first created records

Here is a sample output, just to get an idea of what this looks like (please note that the field definitions in this sample are not the field definitions you used previously).Keep in mind that you have many options to reduce the quantity of logs, for example to get almost nothing on a production system (which by the way is accomplished using a Custom Metadata type).

What’s next?

When you use Forceea in a test method, you really don’t need to create many records, so the 10,000ms CPU limit isn’t an actual problem. Of course you can use the framework to insert records in a sandbox or developer Org when you execute an Apex script in the Anonymous Windows, which of course has the same 10,000ms limit. But when you want to populate a sandbox with 1,000,000 of Accounts, this is another story..

This story is a major part of the next upcoming release (v1.3). The functionality is called Async, it can insert or delete many objects in one transaction, and when you insert objects or delete 1 object it’s surprisingly fast! I have inserted 500,000 of a custom object (without any validation rules, triggers, processes, etc) in 40s! Of course its speed mainly depends on the triggers, etc you have in your actual Org, which may slow down the process significantly (that’s life..)

Anything else?

Yes! I invite everyone to have a look at the detailed User Guide (http://bit.ly/Forceea12_UserGuide) and try the framework.

And I’d like to say a big THANKS to Enrico for hosting this post.

[Salesforce / Einstein] Playing around with apples and Einstein Prediction APIs

The machines are not going to rule humanity…for now.

So don’t be afraid of AI in your daily job as Awesome Developer / Admin / Adminloper.

A new revolution has come in the CRM world and Salesforce leads it as usual.

Einstein is AI brought to our beloved CRM platform, in may ways: enriches your sales decisions, marketing strategies, smartifies your communities and your social behavior.

I know what you are thinking, how can a humble Salesforce developer empower Artificial Intelligence?

Again, afraid be not!

Salesforce conveys a set of APIs for image recognition or text analysis, so you can integrate the power of AI into your application, whether inside Salesforce or not.

What can you do with Einstein APIs?

At the time of writing, you can:

  • Classify images
  • Detect number, size and position of objects inside images
  • Classify sentiment in text
  • Categorize unstructured text into user-defined labels

Read the complete documentation at metamind.readme.io.

In this post I’ll cover an example of how to classify images using Einstein Vision.

Use Case

Can you guess a business use case for this API?

A particulas piece of my fridge just broke down and it is difficult to explain by words which part should be replaced.

Just take a picture of the part and submit to the Einstein Vision engine (properly trained): the backoffice user may now be able to tell the “replacemente department” which part should be sent to the customer.

Another example, my hoven is not working and I don’t remember the model: take a pic, send to Einstein engine, the system can guess the model and execute the proper actions.

In our example we’ll just try to classify apples, not a cool business use case but it effectively shows how the library works.

First configurations

First thing to do is registering for the free Einstein Vision tier.

Go to https://api.einstein.ai/signup, register with your Developer ORG edition (use the Salesforce flow) and then download and save the provided key in the einstein_platform.pem file.

Go to your ORG and create a new Static Resource for this certificate and call it Einstein_Platform: this will be used to generate a JWT OAuth token every time it is needed.

Now create a new Remote Site Setting adding the https://api.metamind.io endpoint (this is the Einstein Vision API endpoint).

Now you are ready to use the provided package.

Before starting you should install the following Apex packages into your ORG (they are open source Einstein Vision wrappers):

Download and install into your ORG the following code from REPO: it’s just 2 pages and 2 classes.

Before starting be sure to change your Einstein APi email address in the EinsteinVisionDemoController:

public static String getAccessToken(){
    String keyContents = [Select Body From StaticResource Where Name = 'Einstein_Platform' limit 1].Body.toString();
    keyContents = keyContents.replace('-----BEGIN RSA PRIVATE KEY-----', '');
    keyContents = keyContents.replace('-----END RSA PRIVATE KEY-----', '');
    keyContents = keyContents.replace('n', '');

    // Get a new token
    JWT jwt = new JWT('RS256');
    jwt.pkcs8 = keyContents;
    jwt.iss = 'developer.force.com';
    jwt.sub = '[email protected]';
    jwt.aud = 'https://api.metamind.io/v1/oauth2/token';
    jwt.exp = '3600';
    String access_token = JWTBearerFlow.getAccessToken('https://api.metamind.io/v1/oauth2/token', jwt);
    return access_token;    
}

Configure the Dataset

This repo has a configuration page (for model training) and a prediction page (see a live demo here ).

Let’s open the administration page named EinsteinVisionDemoAdmin.

In the Dataset URL input copy the following dataset URL: https://raw.githubusercontent.com/enreeco/sf-einstein-vision-prediction-demo/master/dataset/mele.zip.

This ZIP file contains 6 folders: each folder represent a kind of apple (the folder name is the corresponding name) and it contains a list of 40/50 images of that kind of apple (I’m not an expert of apples, so some pictures may not be correct!).

Now press the Create Model Async button: there are 2 kinds of API for this porporuse, one is sync (and accepts zip files of up to 5 MB) and the other one is async (and accepts size of more than 5 MB).

This means that in this example we’ll be using only the async API: the request is taken in charge:

DATASET:

{
  "updatedAt" : "2017-07-11T14:17:33.000Z",
  "totalLabels" : null,
  "totalExamples" : 0,
  "statusMsg" : "UPLOADING",
  "name" : "mele",
  "labelSummary" : {
    "labels" : [ ]
  },
  "id" : 1006545,
  "createdAt" : "2017-07-11T14:17:33.000Z",
  "available" : false
}

Now you can press the button labelled Get All Datasets and Models to watch the upload operation complete:

Datasets: 1

{
  "updatedAt" : "2017-07-11T14:17:37.000Z",
  "totalLabels" : 6,
  "totalExamples" : 266,
  "statusMsg" : "SUCCEEDED",
  "name" : "mele",
  "labelSummary" : {
    "labels" : [ {
      "numExamples" : 38,
      "name" : "red_delicious",
      "id" : 52011,
      "datasetId" : 1006545
    }, {
      "numExamples" : 44,
      "name" : "granny_smith",
      "id" : 52012,
      "datasetId" : 1006545
    }, {
      "numExamples" : 45,
      "name" : "royal_gala",
      "id" : 52013,
      "datasetId" : 1006545
    }, {
      "numExamples" : 42,
      "name" : "golden",
      "id" : 52014,
      "datasetId" : 1006545
    }, {
      "numExamples" : 53,
      "name" : "renetta",
      "id" : 52015,
      "datasetId" : 1006545
    }, {
      "numExamples" : 44,
      "name" : "fuji",
      "id" : 52016,
      "datasetId" : 1006545
    } ]
  },
  "id" : 1006545,
  "createdAt" : "2017-07-11T14:17:33.000Z",
  "available" : true
}

Now we can train our model by copying the dataset id into the Dataset ID input box and pressing the Train Model button: Einstein analyzes the images with its deep learning algorithm to allow prediction.

MODEL:

{
  "updatedAt" : "2017-07-11T14:21:05.000Z",
  "trainStats" : null,
  "trainParams" : null,
  "status" : "QUEUED",
  "queuePosition" : 1,
  "progress" : 0.0,
  "name" : "My Model 2017-07-11 00:00:00",
  "modelType" : "image",
  "modelId" : "UOHHRLYEH2NGBPRAS64JQLPCNI",
  "learningRate" : 0.01,
  "failureMsg" : null,
  "epochs" : 3,
  "datasetVersionId" : 0,
  "datasetId" : 1006545,
  "createdAt" : "2017-07-11T14:21:05.000Z"
}

The process is asynchronous and takes some time to complete (it depends on the parameters passed to the train API, see code).

Press the Get All Datasets and Models button to see the process ending:

Datasets: 1

{
  "updatedAt" : "2017-07-11T14:17:37.000Z",
  "totalLabels" : 6,
  "totalExamples" : 266,
  "statusMsg" : "SUCCEEDED",
  "name" : "mele",
  "labelSummary" : {
    "labels" : [ {
      "numExamples" : 38,
      "name" : "red_delicious",
      "id" : 52011,
      "datasetId" : 1006545
    }, {
      "numExamples" : 44,
      "name" : "granny_smith",
      "id" : 52012,
      "datasetId" : 1006545
    }, {
      "numExamples" : 45,
      "name" : "royal_gala",
      "id" : 52013,
      "datasetId" : 1006545
    }, {
      "numExamples" : 42,
      "name" : "golden",
      "id" : 52014,
      "datasetId" : 1006545
    }, {
      "numExamples" : 53,
      "name" : "renetta",
      "id" : 52015,
      "datasetId" : 1006545
    }, {
      "numExamples" : 44,
      "name" : "fuji",
      "id" : 52016,
      "datasetId" : 1006545
    } ]
  },
  "id" : 1006545,
  "createdAt" : "2017-07-11T14:17:33.000Z",
  "available" : true
}

{
  "updatedAt" : "2017-07-11T14:22:33.000Z",
  "trainStats" : null,
  "trainParams" : null,
  "status" : "SUCCEEDED",
  "queuePosition" : null,
  "progress" : 1.0,
  "name" : "My Model 2017-07-11 00:00:00",
  "modelType" : "image",
  "modelId" : "UOHHRLYEH2NGBPRAS64JQLPCNI",
  "learningRate" : null,
  "failureMsg" : null,
  "epochs" : null,
  "datasetVersionId" : 3796,
  "datasetId" : 1006545,
  "createdAt" : "2017-07-11T14:21:05.000Z"
}

We are almost ready!

Predict!

The only thing you have to do is to open the EinsteinVisionDemo demo passing the above Model Id (e.g. /apex/EinsteinVisionDemo?model=UOHHRLYEH2NGBPRAS64JQLPCNI):

The data set used is not the best dataset out there, it’s been created with the help of Google and a little of common sense, also the number of images for folder is only 40/50, this means the algorithm does not have enough data to get the job done…but actually it does its job!

May the Force.com be with you!” [cit. Yodeinstein]

[Salesforce] The Sobject Crusade: ApexTrigger

Source: ApexTrigger

The ApexClass is the most beloved object for Salesforce Developers.

It identifies a specific Apex Class, so you can query for Classes runtime.

Note that, even if the describe states that the ApexTrigger is creatable and updatable, an exception is thrown if you try to insert/update via API a trigger: use the tooling API or metadata API instead.

Among the fields, you can query for the Body of the trigger, whether it is valid or not, size in byte without comments.

Here an example:

Select Id, Name, ApiVersion, Body, IsValid, LengthWithoutComments, TableEnumOrId, UsageAfterDelete, UsageAfterInsert From ApexTrigger ORDER BY Name

[Salesforce] The Sobject Crusade: ApexTestQueueItem

Source: ApexTestQueueItem

The ApexTestQueueItem object gives you access to the underlying test item for a given test job for a given class.

If you don’t know what is a test class refer to this article to get started: a test class is a class used to (guess what?) test a set of apex classes / triggers in order to verify and certify the features of your implementation.

Every ORG must have at least 75% of code coverage (here for more details), that is your test classes should cover at least 75% of the lines you have written in your Apex classes.

To execute a test class (or a set of test classes), go to Your Name > Developer Console, click on Test menù, select New Run and then select the test classes you want to execute:

On the lower part of the console you can see the test executing:

You can now query all the single job items (the second level of the tree):

select id, ApexClass.Name, ExtendedStatus, ParentJobId, Status, CreatedDate from ApexTestQueueItem order by CreatedDate desc

You can update a ApexTestQueueItem to change its status if you want to abort the job (setting Status to Aborted), or you can insert a new ApexTestQueueItem object: this will create a new Process Job, e.g.:

ApexTestQueueItem item = new apextestqueueitem();
item.ApexClassId = [select id from apexclass where name = 'CommunitiesLandingControllerTest'].Id;
insert item;

Page 1 of 3

Powered by WordPress & Theme by Anders Norén