When Salesforce is life!

Author: Enrico Murru Page 8 of 20

[Salesforce / Ohana Community Italia] Part 1: Salesforce Community on Slack workspace

For those of you who has no idea of what the Ohana Community Italia is, please refer to this post I wrote in the late December 2017.

Long story short, we are building our own nation wide Salesforce community…

This is a handy GitHub repository with all the code needed to follow this article.

I want to document the build of this community, in terms of all the actions we’ll take to create all the little pieces.

Hopefully, we’ll create a public repository with all the code and stuff, so anyone could create what we are doing!

The Community

The idea is to build a Salesforce Community inside a dedicated ORG in order to easy communication and sharing of ideas between italian trailblazers.

Thanks to Nino Guarnacci, our amazing sponsor from Salesforce Italy, we have a dedicated Salesforce DE ORG with all the necessary licenses.

This requires to:

  • choose the best Salesforce Community for our needs
  • configure all the features of the community
  • create a registration page
  • cover of the base topics for the start up

This is not a simple task, I don’t mean technically, but in terms of time.

That’s why we decided at first to freeze the building of the community in a Salesforce ORG (that is actually been built on the background) and speed up the process of putting together people using a more common and well known tool, configuring a Slack workspace.

At the time of writing the Ohana Community Italia is live at italia.ohana.community and its topics are publicly available, although it’s been constantly improved day by day (let’s say we are on Beta).

ohana-community-italy.slack.com

Slack is a great tool for collaboration and it seemed a cool way to start.

That’s why we created the Ohana Community Italy Slack workspace.

The configuration of the workspace is quite simple, we have administrators and users, with different powers (it depends on how much power you want to give to your users):

But how do you get on the Slack community?

We decided to leave the invitation private at first.

Invitation happens in 2 ways:

  • Direct invitation by an admin
  • Form compilation of an invitation request

Web-To-Case invitation form

The idea is to create a new Case when a new trailblazer wants to join, using the web-to-lead feature (a pretty standard feature), that automatically generates a Case from a web form, exposed pubblicly on a Force.com site.

We took the auto-generated HTML form from the Salesforce setup and customized it based on our needs:

There is no need to enter in the details of this configuration, as there is plenty of stuff out there (Salesforce docs enter in enough details to get started).

Refer to the Subscribe.page on the repository.

Send invitation to Slack

And now?

Someone must send an email to invite the person who succesfully created a new Case on the ORG.

For the first times of the life of the Slack community we are handling this by hand, but we should soon automate this in a Case trigger (TO DO).

To send invitation links to specific email addresses we need:

      A Slack app linked to your slack workspace
      A page in the Case layout with a button to make the call
      The right REST commands to trigger the invitation email

Create a Slack App

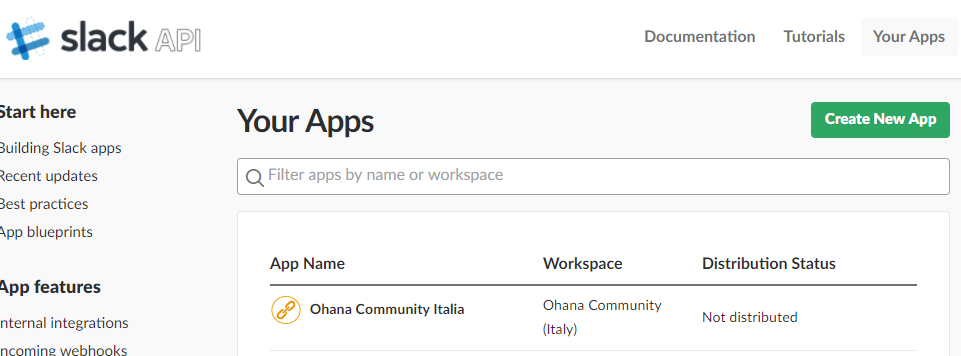
Jump to https://api.slack.com/apps:

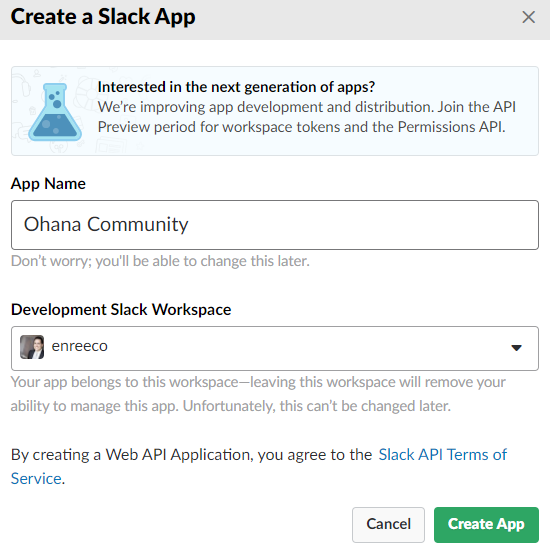
Create a new app and link it to a workspace (in this example I’m using my own personal Slack instance):

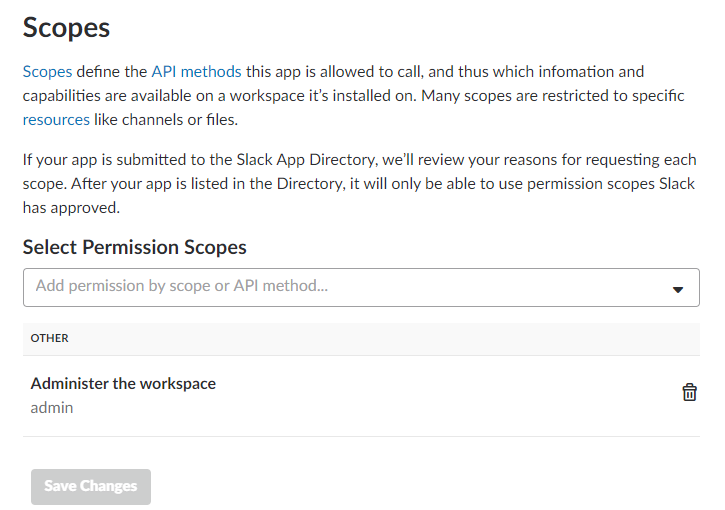
Espand Add features and functionality section and hit Permissions. Scroll down and add the Admin scope:

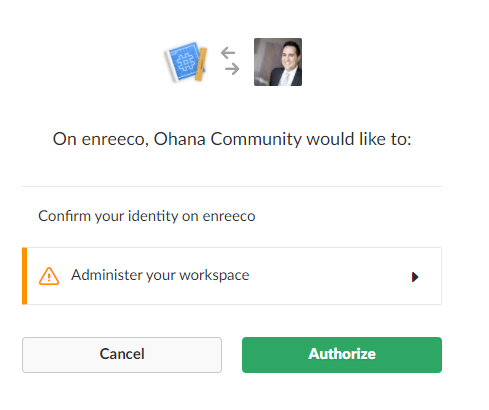
Now that you have at least one scope, you can install the app on your workspace:

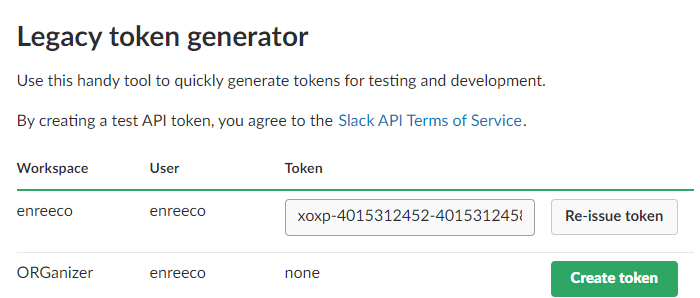
Last thing to do, is generate a quick and dirty legacy token with full super powers on https://api.slack.com/custom-integrations/legacy-tokens:

Copy this token for next configuration.

A button to invite them all

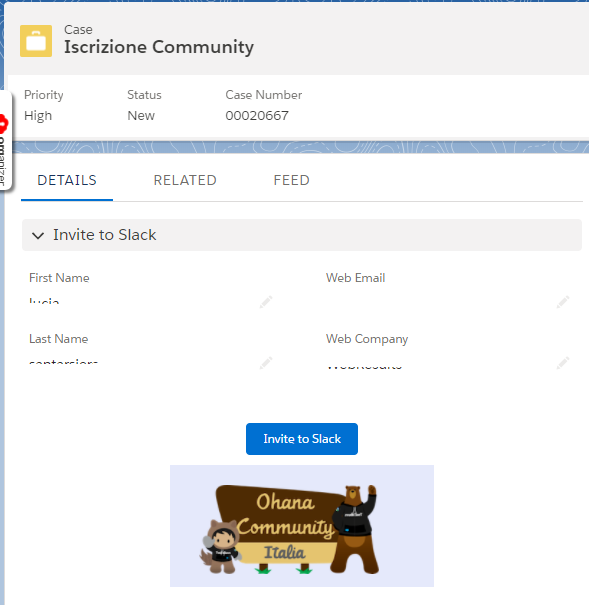
A new VF page will be put inside the Case using the layout editor.
Refer to the OhanaCommunityInvitation.page on the repository.

This page simply takes a case (of a certain Record Type, Community_Management), and by pressing the Invite to Slack button makes a call to Slack to actually send the invitation email.

Take the SlackUtils class and update the oauthToken property placing the OAuth Slack legacy token generated in the previous section:

public class SlackUtils {
    /*
     * OAuth token for admin tasks took from https://api.slack.com/custom-integrations/legacy-tokens
     * TODO: replace with Custom Setting or Oauth Call
     */
    public static String oauthToken{
        get{
            return 'xoxp-XXXXXXX-XXXXXXXXXXXXX-XXXXXXXXXXX-XXXXXXXXXXXXXXXXXXXX';
        }
    }

This class contains the main actions will be using for communicate with Slack.

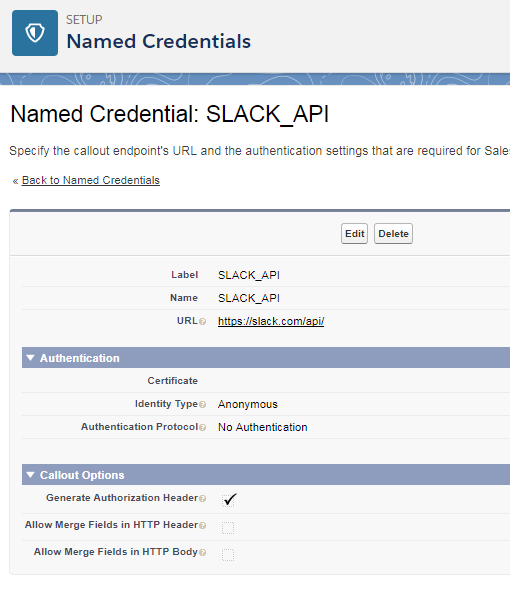
You also need to enable the Slack API endpoint, you can easily do it using a Named Credential:

The invitation email is not a documented REST method, but I found a solution in Stack Overflow thread.

If the invitation is sent sucessfully, the case is automatically closed.
If the case is closed you still have a chance to re-send the email, using the resend=true parameter to the call.

Slack bot says: “Hey there’s a Case awaiting for an invitation!”

Invitation are not currently sent automatically, so we need a way to notify the administrators of the community so they can push the button (before you say a word…I know this is not the most comfortable flow).

We’ve built a scheduled Apex process that sends a notification every morning in a specific Slack channel: although this is not so comfortable, I admit I wanted to do this to write something with a bot from Salesforce to Slack!

The code is in the NotifyNewUsersOnSlackSch class and you should update the ohanaServiceChannel property to change the channel name.
In the SlackUtils class you can also change the Bot name and icon (the URL must be available pubblicly).

What’s next

Next steps are enable automatic Slack invitations on Case creation (the job is needed in case of errors or connection problems) and finally publish the Salesforce Community…but it is another story!

Remember to star the GitHub repository with all the code needed to follow this article.

Join the Ohana Community Italia, but you should at least say Hello in Italian!

New year, new style (⌐■_■)

Welcome to the new Nerd at Work!


It took me 5 years but finally this blog has been completely rebranded and moved to WordPress.

I thank Davide D’Annibale for helping me customizing this theme and drawing the funny graphics (with my BIG face).

Yes, that’s so…my face is supposed to be the main logo of the blog

My Big Face

Funny, uh?

Uncomfortable? Quite, I know…

I can’t wait to read your opinions about this and any suggestion to make this blog awesomer!

I also want to thank the great trailblazers who help me by writing amazing and original guest posts: hope this page will contains tens of people!

Do you want to be a guest blogger for Nerd at Work?

Contact me!

Last, the sponsors page will contain the sponsors of this blog, who will help me to keep this blog up and running!

Do you want to be a sponsor of Nerd at Work?

Contact me to see your awesome company/app on the main page!

Remember to subscribe from the sidebar form!

New posts on the next weeks! Keep enjoying!

[Salesforce / AppExchange Series] Streamline Project Management with Cloud Coach Milestones

This week’s AppExchange hero is Brandi Johson, marketing consultant at Cloud Coach, who is going to present us Cloud Coach Milestones, the ideal tool for simple task and project management on the Salesforce platform.

Brandi Johnson is a marketing consultant and certified Salesforce admin. She focuses on helping clients create effective marketing strategies and leverage the right marketing technology to meet their unique business needs.

Cloud Coach specializes in enterprise-class project, PSA & PPM software built for businesses that want to make strategic investments in their success. With our unique four-tier approach to project management solutions, as your business grows, Cloud Coach can grow with you. Learn more at CloudCoach.com.

Wouldn’t it be nice if everything you had to do at work was easy?
Then they may not have to call it work!
As businesses grow, the challenges they face get more complex – especially when it comes to working with your team to accomplish your goals.

One critical example of this is new customer onboarding.
Whether you’re in SaaS, professional services, or manufacturing, having a streamlined customer onboarding program is vital to your success.
A strong customer onboarding program helps you increase customer satisfaction and reduce churn. Plus, it reduces the stress on your team as they’re moving through the process.

Let’s take a look at Serenity Software – a B2B SaaS company. They’ve nailed their sales process leveraging Salesforce. But once a new customer signs on, the wheels start to come off the process. Emails fly back and forth between the account executive and customer support team trying to track down the details needed and sharing status updates.

The customer success manager keeps shared spreadsheets for each of the clients that they’re working with.

Unfortunately, the team isn’t great about keeping them up-to-date with status updates – leading, of course – to more emails.
They also tried using Trello to keep track of their projects, but they had the same problems: nobody wanted to log into yet another system to see what they needed to work on or post status updates.

Finally, the customer success manager discovered Cloud Coach Milestones in the Salesforce AppExchange. In minutes, she was able to start organizing her customer onboarding projects and increasing collaboration with her team.

She started by creating a template from the spreadsheet she had been using. It was easy to add additional details to each task using subtasks, and assign the work out to her team. Plus, Cloud Coach Milestones put everything into an easy-to-use Gantt chart so she can see at a glance how long everything each tasks takes, and when things are running behind.

Serenity Software took streamlining their projects a step further, and leveraged Salesforce Process Builder to automate their project creation.

Now, whenever an opportunity is marked as Closed-Won, a new project is automatically created leveraging the template the Customer Success Manager created.

Those new projects are automatically connected to the account, so everyone has a 360° view of the customer and the project while its in-progress.

With Cloud Coach Milestones, Serenity Software streamlined their project management processes.

They have happier clients, faster onboarding, and better team communication.

Since all of their projects are in Salesforce where they’re already managing the rest of their business, they can see all of their important business KPIs on centralized dashboards.

No data imports, no APIs.

Could Cloud Coach Milestones work for your business?

If you run projects, then yes, it could.

Plus, you can get started in less than 10 minutes.

Step 1: Install Cloud Coach Milestones from the Salesforce AppExchange. Of course, we recommend installing into your Sandbox, not your production org.

Step 2: Check out the getting started videos. When you visit the Cloud Coach Milestones App, you’ll see a tab for “Getting Started.” These videos give you a great overview of Cloud Coach Milestones in action, and help you answer a ton of questions before they get asked.

Step 3: Create a project. Before you start sharing Cloud Coach Milestones with your team or customizing, I recommend that you build your own simple project. This helps you see how Cloud Coach Milestones works out of the box so you can make better choices about integration and customization.

Step 4: Customize your projects. Since Cloud Coach Milestones is built on the Salesforce platform, you can do a lot of customization on your projects to meet your business needs. For example, you may want a field to identify what type of project your team is doing for a client. Choices would be onboarding, maintenance, or special request. By adding a field on the project object, you can add this customization in minutes.

Step 5: Integrate with your existing objects and processes. Out of the box, Cloud Coach Milestones has lookup relationships to Opportunities, Accounts, Cases, and Campaigns. To associate projects with another object (custom or standard), create a new custom lookup field that points to the Cloud Coach Milestones object. Then, add the Milestones related list the page layout, and any projects you launch from that list will be visible on the project.

With Process Builder, you can automatically create projects from your business best-practice templates. The Cloud Coach Milestones Knowledge Base has details on how to autocreate projects with Cloud Coach Milestones and lots more.

Step 6: Assign permission sets to the users that need access to Cloud Coach Milestones. There is no limit to the number of users within your org who can use Milestones. Just like everything else about Cloud Coach Milestones, security was designed with simplicity in mind. There are only two permission sets you need to work with:

  • CCMI | Minimum User Permissions – grants a user access to all standard Milestones functionality and views. A user with this permission set assigned can create their own projects, view projects that aren’t their own, and manage their tasks and projects.
  • CCMI | Admin Permissions – permits exactly the same functionality but also includes the ability to load sample data. This is useful for Partners or Users who need to demo or test the product but do not want to spend time creating sample projects.

You’re never alone when you’re working with Cloud Coach Milestones. In addition to the extensive knowledge base that’s growing every week, we offer a free 30-minute onboarding consultation for new installs, and weekly open forum webinars to answer your questions.

Ready to get started with Cloud Coach Milestones? Just head over to the Salesforce AppExchange and click “Get It Now” to get started!

And it’s available on Salesforce Lightning and Classic!

[Salesforce / AppExchange Series] RingsTrue: Smarter phone numbers in Salesforce

This week’s new post is dedicated to a new AppExchange app, meant to help us in one of the most difficult and annoying tasks on every CRM: phone number validation.

Thanks to our week’s guest blogger Iain Clements.

Iain runs Cloud Ursa Ltd, a registered Salesforce partner based in the UK. In addition to helping customers configure Salesforce, we also make RingsTrue.

XConnect is a world renowned telecommunications routing specialist that provides the world’s leading global telephone number data and phone intelligence services. XConnect combines trusted information from hundreds of disparate global data sets and enables our customers to build the best communication services and applications using our unified data via simple, secure, scalable and real-time interfaces.

Managing data quality in Salesforce can be time-consuming.

Making sure that your customer records have correct telephone numbers is an endless task. However, authentic numbers lead to less failed call backs and lower contact centre costs. If that phone number belongs to a new potential customer, getting the right data also improves your business.

Can’t I just fix them with regular expressions?

Not easily! Unlike other global numbering schemes (eg IP addressing), Telephone Numbers have evolved organically, (and not necessarily logically). Using Regular Expressions (REGEX) means creating a set of rules, to take a string of information and ‘reformat’ that information into something else.

But what are these rules for Telephone Numbers?

  • Is the number in national or international format?
  • Does it include the national dialling code (eg 0)?
  • Does it include a country code ? How many digits is that country code?
  • Is the country code valid?
  • Does the remaining number have the correct number of digits for that country code ?
  • Is the National number prefix valid for that country?

So what’s the answer?

Well, we’re biased of course but we think our app RingsTrue is a huge time saver for this work.

RingsTrue powered by Xconnect brings a wide range of number checking functionality to your Salesforce environment and tells you if your telephone numbers are authentic or not. It’ll do the heavy lifting of formatting, validating, and actively testing the telephone number for every contact in your database.

Using RingsTrue, powered by XConnect, you will be able to:

  • Identify which telephone numbers in your CRM are Authentic and whether an authentic telephone number is a mobile number, fixed line number, or some other telephone number type.
  • Check which of the authentic telephone numbers is known to be In-Service with telecommunications provider.
  • Discover additional information about the capabilities and services supported by the end-uses devices, as well additional data made available by the mobile service provider.

How do I install it?

  1. Go to the Appexchange
  2. Click on Get It Now
  3. Choose to install in your test environment or your live environment
  4. When installed, go to the RingsTrue homepage and either click ‘Run’ or choose a schedule of phone checking to suit your company
  5. When RingsTrue has checked all of your records you will see clearly what the current status of that number is

Where can I try it out?

Try it for free for 5 days with no obligation, click here to start now!

[Javascript / Chrome / EasyPeasy] Blocking form autocomplete after Chrome Canary (version 65)

Recent Google Chrome update (65) brought something that developers are not liking too much: the autocomplete=”off” attribute on forms and inputs is no more considered.

Read in depth this Stack Overflow thread.

The solution (not so clear) is to give a random autocomplete value to the autocomplete attribute of each input of the form:

$('form input').each( function(){
   $(this).attr('autocomplete','no-autocomplete-'+(Math.random()*Math.random()));
});

Also apparently Chrome uses the name attribute (at least for email and password values), in my use case the name attribute was not necessary in the form so this script worked like a charm.

[Salesforce / AppExchange Series] Skyvia: easy way to load your Salesforce data into Amazon Redshift

Here we are in the next Salesforce app guest post.

Skivia is a great solution for Data warehouse in the cloud, with tens of integrations and connectors to integrate, back up, access, and manage your cloud data
with an all-in-one cloud service. With Skivia service you have to think less about where to put all your data (from all your data sources on the cloud) to concentrate on analysis.

Skyvia is not an AppExchange app but it’s an amazing service that fully deserves to be mentioned in one of the best services out there to work with Salesforce data.

The guest blogger

Jacob Martin is crazy about all stuff connected with coding, particularly all Hi-tech ones, such as Cloud computing, Big-Data, BI tools and CRMs in the broader sense.
He is a cloud engineer at Skyvia – the universal cloud data platform for no coding data integration, backup, management, and access.

With the powerful data analysis features and low storage costs of cloud data warehouse services, loading data from cloud applications to data warehouses becomes a very common task. For example, you may want to get your cloud data to a database and then use some BI tool, such as Looker, Tableau, or chart.io, or just to store your historical cloud data in a database for archiving or compliance purposes.

In this article I will describe a way how to load data from Salesforce to Amazon Redshift with almost no efforts using Skyvia service. It is a cloud data platform for data integration, backup, management and access, which can perform this task with no coding and very little configuration.

Replication Configuration in Just a Few Steps

Skyvia is a completely cloud solution that requires no local software except a web browser, and all actions in it are performed via web browser, in a convenient web GUI.

To replicate your data via service, first, you need to register on it. Creating an account is free, and you can try Skyvia within its free pricing plan that allows you to load up to 5000 records per month between cloud applications and databases.

After you create an account, on the Integrations page, click Create Now under Replication. A replication package editor page is opened.

Setting up Connections

In our example, we will use Amazon Redshift as a target database for replication. Note that you may need to configure your AWS security settings to allow access to your Amazon Redshift cluster from Skyvia’s IP – 40.118.246.204. This is necessary for Skyvia to be able to load Salesforce data into your Redshift database.

First, we select connection types in the Source and Target headers, as we want to etl Salesforce data to Amazon Redshift, will choose them respectively. Note that Skyvia also supports other data warehouses and relational databases, including Google BigQuery, Asure SQL DWH, SQL Server, PostgreSQL, etc. The full list of supported data sources you can find here.

After this, we need to create the corresponding connections. For Salesforce, the service supports both Username/password and OAuth connections. With the latter option, your Salesforce credentials are not stored on the Skyvia server. You simply enter a connection name, log in to Salesforce and allow Skyvia access to your data.

For Redshift, you need to specify the corresponding connection parameters. Note that for replication you not only need to specify main parameters for connecting to Redshift itself.

You also need to click Advanced and specify parameters for connecting to Amazon S3 storage.

To improve the replication performance, Skyvia creates CSV files with Salesforce data, uploads them to Amazon S3, and uses Redshift COPY command to quickly import data.

Selecting Objects

After you connected to your Salesforce and database, everything is simple. You will see the list of your Salesforce objects and you just need to select check boxes for the objects that you need to copy. A convenient object search allows you to quickly find and select the necessary objects.

You can perform complete or partial replication. For each object you can edit task and exclude some fields or set up filters to copy only a part of the data.

Running Replication

For one-time data loading this is enough. Click Save, and then you may run your replication.

By default, Skyvia automatically creates tables with the corresponding structure in the database, and in some minutes (depending on the volume of your Salesforce data), you will have an exact copies of your Salesforce objects in your database.

Keeping Data Up-to-date

Simple copying of data is not the only feature of Skyvia’s replication. However, for business analysis tasks it’s better to have access to as fresh data as possible. This task can easily be solved using flexible scheduling settings and allows automatically keep your copy of the data always up-to-date.

You can schedule your replication to run automatically and keep your Redshift database always synced with Salesforce. To configure a schedule open the created replication package for editing, and under Schedule (at bottom left of the package editor) click Set schedule.

Skyvia allows flexible schedule configuration. You can configure your replication to run monthly, weekly, daily, on specific weekdays, etc. In non-free pricing plans you may run replication and update your database with a fresh data from Salesforce every hour or every few minutes and get real-time insights on your data. Thus, after you configure your replication, you can easily keep your database always up-to-date.

Skyvia uses incremental updates. This means that every time it loads only the records that were changed in Salesforce since the previous package run, and applies the corresponding changes to the database. It can significantly improve performance and decrease costs, as the latter depends on the number of replicated records.

Universal Cloud Data Platform for Integration

Skyvia is a universal cloud data platform, and replication is only one of the supported integration scenarios. In addition to replication, it supports other operation kinds: import, export, and synchronization.

The replication is used when you need to simply copy data from a cloud app to a database or cloud data warehouse and automatically keep this copy in a current state with minimal configuration efforts. Synchronization synchronizes data in two sources bi-directionally. Export allows you to export data from cloud applications, like Salesforce, and databases to CSV files. Import serves for unidirectional data loading.

Import has some more complex configuration than replication, but it is much more flexible. It allows importing data from CSV files or from cloud applications and databases directly to other cloud applications and databases. Unlike replication, it doesn’t create target tables automatically. Instead you configure mapping between source and target tables and columns.

Powerful mapping settings allow you to load data between the data sources with the different data structure and formats while preserving relations between data. You can provide constant values, use powerful expressions, lookups, etc.

Import can be configured to load only newly updated or inserted records from Salesforce. Thus, we can perform a replication once to create the necessary tables and import all the data, and then configure import to load new and updated records from Salesforce.

As an all in one cloud data platform, Skyvia also offers a cloud to cloud backup solution, an online SQL query tool, and OData REST API server that can make your data available over the web.

Pricing

Skyvia’s integration pricing depends mostly on the number of loaded records. Additionally, higher pricing plans allow scheduling packages to run more often and having more scheduled packages.

Skyvia has a free pricing plan for data integration, allowing you to load 5000 records per month for free. So you can register an account on Skyvia for free and test it whether it suits to your needs and then decide whether to upgrade your pricing plan.

You can see details on Skyvia pricing on their pricing page.

Here is a handy video showing live how Skyvia works.

[AppExchange series] Calling all Ohana and ISVs!

Do you have a #Salesforce app on the Salesforce AppExchange?

Wanna share its super powers with the world?

#NerdAtWork is more than happy to blog about it and host your awesome app!

DM me on Twitter or contact me at [email protected]!

Can’t wait to host amazing guest posts!

I WANT YOU!

[Salesforce / ORGanizer] Christmas Release 0.6.5 is live!

A new Christmas gift for my ORGanusers.

Christmas Release 0.6.5 is live!

It’s months I’ve been asked for an ORGanizer Firefox version and, drum roll…it is finally live!

It’s an important milestone: the ORGanizer can now be enjoied on the most widespread browsers.

That’s why I’m here to ask you to register to the ORGanizer beta program: I can track who wants to help me in enhancing our beloved extension, send them early releases (before the official production release), making the ORGanusers a community in our amazing Ohana community!

What’s more?

Increased usage limit

  • 200 total accounts
  • 150 total sync accounts

Conrt SF Id plugin now has a quick action to copy the current SF ID on the clipboard.

Configure all plugin shortcuts from the Options page:

Enhanced Formula plugin now plays correctly on Lightning Experience!

Follow the release notes for more details!

Don’t forget to Support the ORGanizer, the Best Salesforce Extension ever!

[Salesforce Ohana] Movember Cloud: a chat with Paolo Bergamo and the future of the italian Salesforce tech community

Italian Pride

I always say I’m a proud italian nerd.

This doesn’t mean I think everything from Italy is always the best, but I recognize that we, as Italians, can do a lot of beautifull things, from culture (I’m not talking about our politicians…but who does?) to food (I’m talking about spaghetti, but not about my code).

I’m writing this post (with a bit of delay) because I’m really proud of how me and my friends (with a bit of help from amazing people that I’m about to talk about) have organized a wonderful Salesforce Developer & User Group (DUG) few weeks ago in Milan.

This is the poster of the event:

Paolo Bergamo, who are you?

Few months ago (maybe more that a few, actually) I’ve been contacted by Paolo Bergamo, a Salesforce manager that lives in San Francisco and…drum roll. is italian!

At the time of the call I didn’t know who he was, but I was really hubled by the fact that a Salesforce VP wanted to talk with me to understand how Italian Salesforce devs where set up.

We met in person at the Milano Essentials and we felt really close, despite the fact I was (and am) none and he is actually one of the people that makes Salesforce great for its customers and also for us developers.

About 3 months ago Paolo and Nino Guarnacci (Cloud Solution Engineer at Salesforce) came back to me, introducing the possibility to increase and enhance our italian Salesforce technical community, because I was (and luckily still am) the only italian MVP and I was active online, so there is a bunch of italian guys that already has heard my name. They thought I could help them spread Salesforce Ohana in the italian community.

This is something I’m trying to do since I was nominated MVP, but it’s not easy and that’s the reason we’ve set up the Milano Developer Group with my beloved buddies Gianluca Perrone, Tonino Tripodi and Stefano Massoni.

The Movember Cloud Event

What’s the best way to make people come to the Salesforce side and enhance the community?

#1 Sharing amazing trailblazers stories, and Paolo Bergamo was a beautiful example of an amazing life (he’s a close friend with Mark Beniof and worked with Steve Jobs).

#2 Setting up a centralized italian Salesforce dev Community and Nino knows how this job must be done (he was one of the founders of Codemotion).

The Movember Cloud event (the name if deliberately funny) has been a real success: we still don’t have the power to acquire hundreds of people but we had more than 80 people that came to hear about Paolo Bergamo’s life and his funny stories about Mr. Jobs and Mr. Beniof, like when he’s been secretly kidnapped by Apple to develop one of the first Apple Store apps (and it was a Salesforce app) and Steve Jobs told him it was all but shit (seems incredible…but I believe every dev in the world accepts to be told this by Steve Jobs!!), or when Paolo told us that Mark Beniof loves emoticons and usually sends him a funny italian emoticon of a guy that east spaghetti…

I told Paolo to talk freely and he took my word and took the scene for an entire hour, letting people speachless with a lot of inspiring stories about his working life and his career in the Salesforce ecosystem.

This is the full meeting record (only in italian) the covers all the night.

If you want to watch me and Paolo and learn some italian (if you don’t already speak italian), please hit play on this video!

Paolo (and all the swag Paolo and Nino brought) was actually a bait, because we want to make people listen to what me and Nino were planning in the last month: create the very first Salesforce Italian Dev (and Admin) Community.

It is something really amazing that could really increase italian presence in the Salesforce world.

The Ohana Community and Nino Guarnacci

As I said at the event, Italy is full of talented people and I cannot figure out why there is only one MVP…the aim of this community is to leverage italian devs & admins skills and make Italian the biggest country community at Dreamforce 2018!

There is still a long way but Nino has already set up the Ohana.community domain (I cannot believe he got it!!!) and this is the starting point for our efforts!

This will be the focal point of italian Dev & Admins, a place where we can share knowledge and introduce people to the Salesforce world, share people, jobs, frienship and whatever we want.

The only way to start our journey is to send an email to [email protected] providing your name, email, social accounts and wait for the magic to happen (we are still setting up the public community).

The community will be responsible for itself: a commitee will manage the ORG (yes we are setting up a Salesforce Community with Chatter and glitters) and everyone will be given the power to put their hands on it: the more you share and be available to do stuff, the more powers you’ll have in the community!

Here is the full presentation deck presented by Nino.

Next steps?

With the power of the community we want to make the first all italian Slaesforce tech event, but we need your help!

Do you want to help us? join the Ohana Community NOW!

[Salesforce / TheMoreYouKnow] Campaign Member Status Configuration

Disclaimer
This is a “better write it down for the future me” post.

For the TL;DR pals, this is the Github repository.

It was years I wans’t working with Campaigns, so it took me a while to remember a simple thing: you cannot automate
Campaign Member Status configuration with point & click
.

It seems awkward, mostly because you have a Status picklist field on the Campaign Member.

And when you cannot find the New button on the picklist related list of that field you start feeling depressed.

After a while (you don’t really need much time, just google it a bit) you find out there is a wonderful Campaign Member Status object, that holds the details of a specific Campaign’s members statuses.

Then you learn (again) that you need to use the Advanced Setup button (in Classic) or the Campaign Member Status related list (in LEX):

When you add a new value the list of values in the Campaign Member Status is automatically updated:

So the next question is:

How to automate this?

Well, unfortunately you can’t, you have to manually create the Campaign Member Status values on every Campaign you create.

If your users create campaigns often, believe they won’t accept it as a solution!

As a simple solution we can:

  • correlate Campaign Member Status values to Campaign Record Types
  • store Campaign Record Type / Campaign Member Status Value couples inside a Custom Metadata object
  • implement a trigger that executes on campaign create or if its record type changes

CampaignMemberStatusConfiguration__mdt

Name and Label standard fields will not be used to store actual values for our feature implementation, becausr they can only store 40 chars that is definitely less than 80 required for Record Type Developer name and 765 required for Campaign Member Status value (we’ll be using max 255 chars in this implementation).

Campaign Record Types

Custom Metadata values

Apex Code algorithm

The following code, invoked from the Campaign trigger, calculates the new Campaign Member Status objects, removing the old one and creating the new ones.

/**
 * @author Enrico Murru (https://enree.co, @enreeco)
 * @description Creates CampaignMemberStatus records based on custom metadata object configuration
 */
public class CampaignTriggerHandler {
        
    public static void execute(){
        //new statuses to be created / updated (with default or responded)
        List<CampaignMemberStatus> defaultOrRespondedStatuses = new List<CampaignMemberStatus>();
        //new statuses to be created / updated (without default or responded)
        List<CampaignMemberStatus> otherStatuses = new List<CampaignMemberStatus>();
        //statuses to be deleted
        List<CampaignMemberStatus> deleteStatusesList = new List<CampaignMemberStatus>();
        
        //selected campaigns
        List<Campaign> cmpList = new List<Campaign>();
        //record types
        List<ID> rTypesList = new List<ID>();
        
        //select only campaigns that are inserted or that changed their record types
        for(Integer i = 0; i < Trigger.new.size(); i++){
            Campaign nCmp = (Campaign)Trigger.new[i];
            if(!Trigger.isInsert
                && nCmp.RecordTypeId == ((Campaign)Trigger.old[i]).RecordTypeId) continue;
            cmpList.add(nCmp);
            rTypesList.add(nCmp.RecordTypeId);
        }
        
        if(cmpList.isEmpty()) return;
        
        //delete standard statuses
        deleteStatusesList = [SELECT Id, Label, CampaignId, IsDefault, HasResponded 
                              From CampaignMemberStatus 
                              Where CampaignId IN :cmpList
                              Order By Label];
        
        //query record types
        Map<ID, Recordtype> rTypeMap = new Map<ID,RecordType>([Select Id, DeveloperName From RecordType 
                                                              Where SObjectType = 'Campaign'
                                                              and Id IN :rTypesList]);
     
        for(Campaign cmp : cmpList){
   
            //we can do as many query as we want with custom metadata
         for(CampaignMemberStatusConfiguration__mdt cmsc : [SELECT Id, RecordTypeDeveloperName__c, 
                                                            StatusValue__c, SortOrder__c,IsDefault__c, Responded__c 
                                                            FROM CampaignMemberStatusConfiguration__mdt
                                                            WHERE RecordTypeDeveloperName__c = :rTypeMap.get(cmp.RecordTypeId).DeveloperName
                                                            ORDER BY StatusValue__c, IsDefault__c DESC, Responded__c DESC]){

    //gets CMS with same label (avoid duplicates on upsert)
    CampaignMemberStatus oldCMS = null;
    for(Integer ci = deleteStatusesList.size()-1; ci >= 0; ci--){
                    CampaignMemberStatus cms = deleteStatusesList[ci];
     if(cms.CampaignId != cmp.Id) continue;
                    if(cms.Label == cmsc.StatusValue__c){
                        oldCMS = cms;
                        deleteStatusesList.remove(ci);
                        break;
                    }
    }
                                                                
    CampaignMemberStatus newCMS = new CampaignMemberStatus(Label = cmsc.StatusValue__c,
                                                             SortOrder = cmsc.SortOrder__c.intValue(),
                                                             IsDefault = cmsc.IsDefault__c,
                                                             HasResponded = cmsc.Responded__c);
    if(oldCMS != null){
                    newCMS.Id = oldCMS.Id;
                }else{
                    newCMS.CampaignId = cmp.Id;
                }
    if(!newCMS.IsDefault 
                   && !newCMS.HasResponded){
     otherStatuses.add(newCMS);
    }else{
                 defaultOrRespondedStatuses.add(newCMS);            
    }
   }
        }
  //this DML sequence guarantees no conflicts
        upsert defaultOrRespondedStatuses;
        delete deleteStatusesList;
        upsert otherStatuses;
        
    }
}

Find all the details in this Github repository.

Page 8 of 20

Powered by WordPress & Theme by Anders Norén